Labels

Painting (372) GW (332) Games Workshop (331) Warhammer 40000 (240) Modelling (103) Astra Militarum (65) Imperial Guard (65) Epic (59) Chaos Marines (51) Warhammer 30000 (51) Space Marines (46) Tau (46) Airbrushing (44) Epic Chaos (44) Warhammer (43) Titan (39) Saga (31) Middle Earth SBG (30) Nurgle (29) Gripping Beast (27) IGTanks (25) Anglo-Saxons (24) Blood Bowl (22) Stormcrow Chapter (20) TauTanks (18) Orks (17) Wargames Table (17) Imperial Knights (16) Scenery (16) Black Scorpion (15) Epic Ultramarines (15) Frostgrave (15) Pirates (15) Age of Sigmar (13) 3D Printing (12) Warlord Titan (12) Kings Of War (10) Moria (10) Undead (10) Vampire Counts (10) Angmar (9) Death Guard (9) Forgeworld (9) Mordor (9) Quick Tips (9) Stormcast Eternals (9) AAR (8) Barad Dur (8) Battle Report (8) Goblins (8) Unboxing (8) Wood Elves (8) Isengard (7) Nippon (7) Orcs (7) Siege (7) Wargames Factory (7) Building modular tiles (6) Dreadtober 2016 (6) Sentinels (6) Skaven (6) Vikings (6) Workshop (6) Beastmen (5) Dreadtober 2017 (5) Dropzone Commander (5) Garroting'em Forest (5) Hawk Wargames (5) Humans (5) UCM (5) Warriors of Chaos (5) Imperial Agents (4) Mantic (4) Ogres (4) Sci-Fi Ruins (4) Solar Auxilia (4) Adepta Sororitas (3) Adeptus Ministorum (3) Dwarfs (3) Necromunda (3) Sisters of Battle (3) The Fellowship of The Ring (3) Dead of Dunharrow (2) Kharadron Overlords (2) Nazgul (2) Osgiliath (2) Photography (2) Renedra (2) Trolls (2) Uruk-Hai (2) Amera Plastic Mouldings (1) Armies (1) Bolt Action (1) Cities of Death (1) Days out (1) Germans (1) Giant (1) Marauder (1) Necrons (1) Perry Miniatures (1) Reaper Miniatures (1) Warlord Games (1) em4 Miniatures (1)

Friday 29 May 2015

Imperial Guard: Tank Renovation Project (Part 4a - Hellhound - half way there)

Time to turn my attention to my Hellhound, I think.Before renovation, it looked like this:

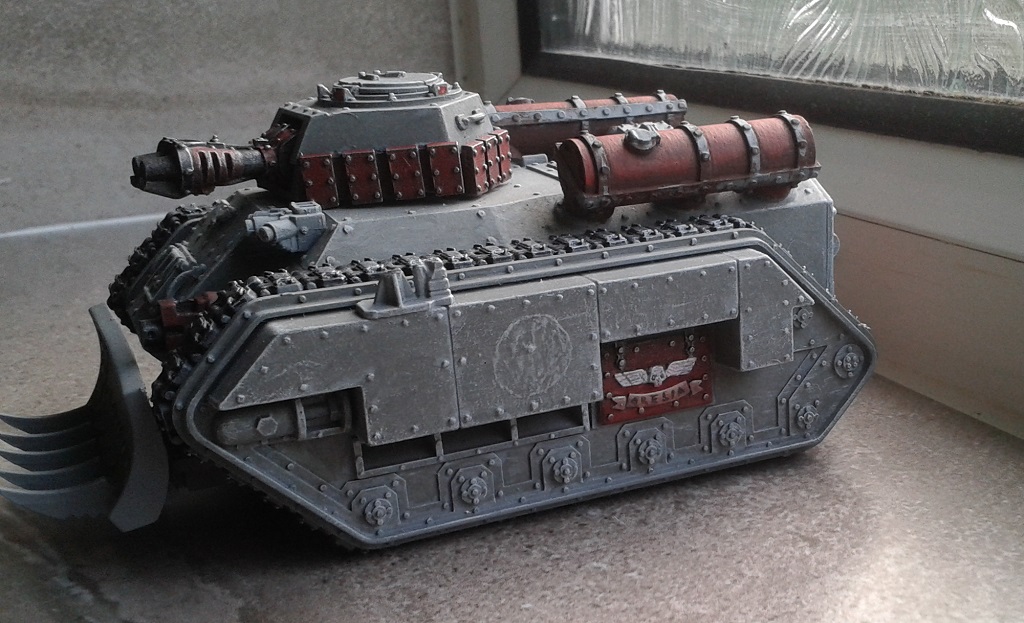
Broadly speaking I'm keeping the same basic colour scheme but the plan is to "beat it up" a bit so it looks weathered rather than the very childish "everything is just flat colours" that it is as shown above.

So I'm following the same process as in my other recent posts:

  • mask the tracks (I hate painting tracks black),
  • spray the whole thing grey,
  • mottle the grey by roughly daubing the whole tank with a slightly darker grey,
  • give the whole thing a heavy drybrushing of white,
  • add details (guns, gun barrels, 'scopes, hatches etc: - I'm half way through that phase in these photos - still got the Dozer and Prometheum tanks to finish).
  • apply decals,
  • apply rust weathering (sponge weathering - quick and easy),
  • all-over black oil wash.


This tank will take me to a landmark stage - when completed I will have more tanks in my army that are finished to a standard that I'm happy with than I simply had "tanks in my army" before I started this renovation project off. It's the first time that my Imperial Guard army has actually expanded in size since I painted my Valkyrie last year. I have three more tanks to go to finish it off after this one is complete and then I can get back to my Tau army (which I've been woefully sidetracked from!).

More Imperial Guard-related stuff:
More Imperial Guard Tank-related stuff:

Tuesday 26 May 2015

Imperial Guard: Tank Renovation Project Part 3f - Chimeras - finished!)

I've completed work on my first two Chimeras and I'm very, very pleased with the result.

I used to hate my IG tanks and almost hated the idea of repainting them as much as I hated the models themselves, but I have to say as I've learned to streamline my work and time projects to pick them up "when I want to do them" rather than "when my guilt drives me into doing something I'm not really up for" I'm working faster and getting more enjoyment out of it.

Anyway - here they are, with all the weathering and oil-washes in place:


Here's just the first Chimera from a couple of angles:


And here's the second:
Really pleased with the side armour on this Chimera...

...which is home-made from foamboard and card!

I have two more Chimeras to do but before I turn my attention to them I'm going to repaint my Hellhound. Watch this space.

More Imperial Guard-related stuff:
More Imperial Guard Tank-related stuff:

Thursday 21 May 2015

Imperial Guard: Tank Renovation Project (Part 3e - Chimeras - decals)

I've done the penultimate step on my work on my first two Chimeras and added the decals:
I can't tell you how pleased I am with my home-made side armour!


Whilst adding the decals a few things occurred:
A multi-laser muzzle fell off (reglued),
A (proper GW; not one of my home-made) side armour panel fell off (reglued),
The penny finally dropped about what all the little protruding rectangles are around the lasguns by the oblong hatch on the hull! They're viewport-thingies so the guys shooting the lasguns can see to aim! I'd always wondered how they did that. I'll add some lens-ey paint to them before I get to the next step...

...which is weathering.

More Imperial Guard-related stuff:
More Imperial Guard Tank-related stuff:

Friday 15 May 2015

Imperial Guard: Tank Renovation Project (Part 3c - Chimeras: detailing begins)

I've started adding detail to the tanks now.

All the metallic bits have been blacked and drybrushed with chainmail, the Weapon housings and muzzles given their dark-red colour to match the rest of the army and the lenses painted on the turret 'scopes. I've painted the leather cowls over the hull-mounted weapons and and deaths-head/aquila thingy on the dozer-blade. Oh, the tarpaulin has been done too.
This model was bought as part of a pair from ebay. It had no turret or side-armour. The turret here came from my bits-box and you can see it's damaged. I'll either find something to cover that (and the scarring on the hull just below it) or will fudge it with some weathering. The side-armour is home-made from foamboard and card!


There is more detail I want to do - I want to do some hazard-markings on the rear hatches and the icon-heavy hatches on both sides need doing. I need to black-out the gun-barrels too then get decals/weathering etc. done.

More Imperial Guard-related stuff:
More Imperial Guard Tank-related stuff:

Tuesday 12 May 2015

Imperial Guard: Tank Renovation Project (Part 3b - Chimeras: adding some texture)

I decided to paint my Chimeras in two pairs rather than all four at once, following the same process I've used on my other Imperial Guard tanks.

So I began by masking the tracks (as they're already mostly painted) and spraying the models with a flat grey rattlecan primer. I then randomly slopped on a slightly darker grey as done before:

Following that, a heavy white drybrushing. As one of the two models has its side armour constructed from foamboard, that left it looking a little flat so I added some "trompe l'oeil" rivets (a small spot of black paint followed by a small spot of white positioned just above it:
Taken with a flash to show up the drybrushing more

Next I will "black" all the rest of the metallic bits (guns, etc) before a chainmail drybrushing will go on.

More Imperial Guard-related stuff:
More Imperial Guard Tank-related stuff:

Wednesday 6 May 2015

Imperial Guard: Tank Renovation Project (Part 3a - Chimeras: rebuilding...)

Now the Leman Russes are done it's time to turn my attention to my Chimeras.

I recently doubled the Chimera count by picking up two more tanks from ebay. I knew when I bought them that they were both missing turrets. I had a spare in my bits box and was prepared to pick another up. What I hadn't realised simply due to not examining the photo clearly enough was that they were both also missing all of their side armour.

As my intention in buying from ebay was to bolster my force on the cheap, I decided that rather than buy bits from a bitz company I'd make them from paperhammer templates.

The side armour was far easier to do than the turret - I simply used some foamcore which is pretty much the correct thickness, glued the paper template to it and cut it out. Then I edged it with card cut using the template and hot-glued it in place.


The turret was far more difficult - I tried three different card types and had problems with them all.

Basically after scoring and folding they would start to break and the fibres would fray. I settled on the one that worked best but I'm not totally happy with it. For strength I filled it with hot-glue which I also used to hold the heavy flamer in place.

Can't wait to get these painted, but as I plan to begin by rattle-can basecoating as I did with my Leman Russes I need to wait for a break in some awful weather we're having here...

More Imperial Guard-related stuff:
More Imperial Guard Tank-related stuff: