Labels

Painting (372) GW (332) Games Workshop (331) Warhammer 40000 (240) Modelling (103) Astra Militarum (65) Imperial Guard (65) Epic (59) Chaos Marines (51) Warhammer 30000 (51) Space Marines (46) Tau (46) Airbrushing (44) Epic Chaos (44) Warhammer (43) Titan (39) Saga (31) Middle Earth SBG (30) Nurgle (29) Gripping Beast (27) IGTanks (25) Anglo-Saxons (24) Blood Bowl (22) Stormcrow Chapter (20) TauTanks (18) Orks (17) Wargames Table (17) Imperial Knights (16) Scenery (16) Black Scorpion (15) Epic Ultramarines (15) Frostgrave (15) Pirates (15) Age of Sigmar (13) 3D Printing (12) Warlord Titan (12) Kings Of War (10) Moria (10) Undead (10) Vampire Counts (10) Angmar (9) Death Guard (9) Forgeworld (9) Mordor (9) Quick Tips (9) Stormcast Eternals (9) AAR (8) Barad Dur (8) Battle Report (8) Goblins (8) Unboxing (8) Wood Elves (8) Isengard (7) Nippon (7) Orcs (7) Siege (7) Wargames Factory (7) Building modular tiles (6) Dreadtober 2016 (6) Sentinels (6) Skaven (6) Vikings (6) Workshop (6) Beastmen (5) Dreadtober 2017 (5) Dropzone Commander (5) Garroting'em Forest (5) Hawk Wargames (5) Humans (5) UCM (5) Warriors of Chaos (5) Imperial Agents (4) Mantic (4) Ogres (4) Sci-Fi Ruins (4) Solar Auxilia (4) Adepta Sororitas (3) Adeptus Ministorum (3) Dwarfs (3) Necromunda (3) Sisters of Battle (3) The Fellowship of The Ring (3) Dead of Dunharrow (2) Kharadron Overlords (2) Nazgul (2) Osgiliath (2) Photography (2) Renedra (2) Trolls (2) Uruk-Hai (2) Amera Plastic Mouldings (1) Armies (1) Bolt Action (1) Cities of Death (1) Days out (1) Germans (1) Giant (1) Marauder (1) Necrons (1) Perry Miniatures (1) Reaper Miniatures (1) Warlord Games (1) em4 Miniatures (1)

Monday 29 September 2014

Tau: Tetras (WIP Update #1)

I'm really enjoying working on these models.

I'm about 80% done - the lower portion of the models are complete, as are the pilots (arms excepted). They are based and - IMHO - looking pretty good!

As I mentioned in my first post, this is my first go at airbrushing a vehicle of any kind and I'm feeling very happy with the result so far.
I've shot these from different angles to show the various sides of the models

I'm determined to push my airbrushing nerves aside as I wrote in my "mission statement" so for the upper portion of the models I'm working on a digital camo paint effect - I should know soon if it's going to work.

More news as it comes in...

Other Tau-related stuff:

Friday 26 September 2014

Tau: Tetras (WIP)

I'm busily (well, not really that busily) working on my first vehicle unit - a squadron of Tetra skimmers.

These are resin models produced by Forgeworld and as such constitute two firsts for me:

  • My first experiments with resin,
  • My first airbrushed vehicle.

Tetras are a fast-attack option, much like piranhas but are only armed with twin-linked pulse rifles and a markerlight. They are piloted by pathfinders.

Now these are a long way from being finished and the photos below are a bit haphazard (please forgive me for that) but I'm enjoying working on them so much and so pleased by the results so far that I thought I'd share them.

A lot of the colour hasn't come out too well in the photos - I'll try and do better for the finished articles.
These are the three chassis for the Tetra squadron. Apart from some brush-work to pick up the console details, they're pretty much done.

Here's a shot with the pilots and carapace resting in place, on a base. Obviously the pilots don't yet have arms and the engines need doing.

And the same model from the front. The white carapace isn't going to stay white - my intention is to stencil a digital camo effect on it.

More Tau-related stuff:

Monday 22 September 2014

Tau: Pathfinders

So here is what was my first Tau unit - a unit of Pathfinders,

I've republished this old post because I've:
  • Added a model to the unit,
  • Repainted the squad leader's flesh,
  • Repainted the drone-controller,
  • Rephotographed the unit on a more interesting backdrop than my sofa ;-)


The keen-eyed amongst you will no doubt notice that only two of the models in this unit are actually "real" Pathfinder models - two old metal ones (the model dead-center and his twin on the far-right).

Most of the others are regular Fire Warriors and the chap with the binoculars is a tank-commander (but binocs seemed appropriate for a scout unit so...).

I make no apologies for this - anyone who's seen my posts before will know I'm a miser who likes to kit-bash and renovate old junk and that's precisely what these guys are. I've simply left off the shoulder pads to denote their scout status.

Seen from behind (which you can't do in this pic) there's another alteration in that I've replaced the regular Tau backpack with one of the small grenade jobbies which fits neatly on, looks like a small air-tank and again makes these guys look a little more "lightweight".

More Tau-related stuff:

Wednesday 17 September 2014

Tau: First experiments with paint - Part 4

Still tinkering.

I know I've harped back to my mission statement a few times now, but I'm actually taking it quite seriously. Especially the bit about airbrushing on every model in the army.

I've been avoiding the airbrush for far too long before I started this project and I'm determined to address that.

I saw a cracking youtube video by Medows on how he painted a riptide - I was really struck by the work he did on the riptide's nova shield - I loved the fact that it looked like it glowed from within with fire and I totally wanted to steal his technique and apply it to my army.

I'm not ready to start on my own riptide yet, so I figured I'd start small - shoulder armour.

You've already seen in my First experiments with paint - Part 1 post that I'd used my airbrush to produce a graduated effect on the shoulder armour for my models - well I decided that I wanted the Tau Fire Warrior symbol to glow like Medows' riptide shield. It would help tie the whole army together as a force if I could repeat that detail across the whole army.

So I set to work - I started by painting the symbol red, then yellow (both from Vallejo model air primary colours paint set) and then added a (minitaire) snow white highlight.

I've done about 50 pads like this. Not all have turned out as well as the one above, but none are complete shockers either. I deliberately let the paint bleed out onto the main pad to achieve my first ever OSL effect.

These pads aren't done yet - I intend to apply an oil wash to pick out the seams in the armour panels and the "lollipop" fire caste logo a bit later on.

On the whole though, I'm well chuffed :)

Other Tau-related stuff:

Monday 15 September 2014

Tau: First experiments with paint - Part 3

I think I've finalised my paint scheme.

I went back over the three models I painted in Part 2 and looked at details I wasn't happy with:
  • gaiters,
  • straps,
  • lenses,
  • cloth,
  • backpack

I deepened the brown on the gaiters and straps by overpainting it with a darker brown and then going back to my original brown as a highlight.

I improved the lenses - I'd originally painted them red, orange highlight to the bottom-right, white dot to the upper-left. I didn't think this looked "deep" enough either, so I took the same dark brown I'd used for the gaiters/straps and overpainted the whole lens, then applied the red/orange/white on top of it.

The backpack also picked up some dark/mid brown detail.

Lastly the cloth got a haphazard white highlight.

Before:

After:

I think it's an improvement.

I still want to give these guys an oil wash to pick out seams in armour plates and deepen the recess on the backpack where the two red lights are. Obviously you can't see what I'm up to on the models' arms either. Sept markings need to be added too. Aside from that, I'm happy with these guys now and this is the scheme I'll be rolling out for the whole army.

I like to work with very limited palettes so I've only used a very small variety of paints so far:

Undercoat:
  • Halfords grey "plastic" primer

Airbrushing (dark to light, all "minitaire" paints): 
  • Nautilus blue, 
  • Werewolf grey, 
  • Snow white

Brush painting (all "Anita's" brand hobby paints - excellent budget paints if you can get them):
  • Black,
  • White,
  • Red,
  • Carrot Orange,
  • Red Earth (the light brown colour),
  • Burnt Umber (the dark brown colour).

Other Tau-related stuff:

Thursday 11 September 2014

Tau: First experiments with paint - Part 2

In a real rush and following on from Part 1, I threw some more paint at my test models last night.

They are still a long way from being finished (they've still got no arms for a start!) but this is the general idea of what my army is going to look like:


Still to do:

  • Oil washes to bring out the seams in the armour,
  • Tidy up the cloth - at the moment it's black with a midnight-blue highlight which isn't coming across at all. I've also hit it in a few spots with the brown I used on the straps which will need tidying,
  • Change the brown used on the gaiters, straps and belt. Not enough "depth" of colour,
  • Improve the lenses on the helmets,
  • Improve the backpacks a little,
  • Belt buckle needs something, but I'm not sure what yet.
  • Give them some arms, of course :-)

Generally, on reflection with a bit more paint in places these guys are looking more "urban winter" than "snow" camo which is what I was originally aiming for, but I like the scheme so I'm going to stick with it.

More Tau-related stuff:

Monday 8 September 2014

Tau: First experiments with paint - Part 1

I couldn't resist any longer. I'm nowhere near finishing building all my models, but I'd ordered some paints the other day for this project and I had to try them out. I just couldn't not do it any longer.

I made a commitment at the beginning of this project:
  • Every Fire Warrior/Pathfinder/Battlesuit model in the army will feature a significant amount of airbrush work - Zenithal Highlighting is my intention,
and the paint I ordered was for just that reason. A set of Minitaire paints from Barwell Bodyworks. I had already primed my models using a rattlecan grey primer and set to work this morning on a few bits and pieces for testing purposes as much as anything else.

I laid out some masking tape, sticky-side-up, on a flat surface to stop bits blowing around as I painted them and painted both sides with "Nautilus Blue":
You'll note some of the pads have arms attached and others don't. I'm building a lot of this force out of ebay cast-offs and had to strip a lot of models down. Some came apart better than others.

I had some paint left in the airbrush so I shot it at a few fire warriors.

Next I went in with a highlight on the upper-edge and sides of the pads with some "Werewolf Grey" (which is clearly blue):

Less paint leftover in the airbrush this time so only three models highlighted.

And lastly I shot some "Snow White":


The photos (especially of the fire warriors) don't really do the result justice. The models have a nice "ice blue" sort of a look to them, which is exactly what I was hoping for so I'm very pleased.

I'm planning to get the rest of the arms and fire warriors to the same sort of level over the next few days and then brush-paint all the cloth bits of the armour. I'm also considering an oil wash to bring out some of the armour seams. I saw a really nice glowing-red effect on a Riptide Shield airbrushing video which I'm planning to rip off and am toying with the idea of picking out the Tau logo on the shoulder pads in the same way. 

This was my first go at doing anything other than basecoating or varnishing models with the airbrush and I'm very pleased with how it went. 


Wednesday 3 September 2014

Tau: Working with Skyrays - Part 1 (Quick Tip)

Whilst plodding (and I do mean plodding - progress has been way slower than I'd have liked) through building the models for my Tau army, I discovered what appears to be the most generously put-together GW model kit I've ever seen; the Skyray.

Now I've owned my Skyray for a few years now, but until now it has stayed, unbuilt, in its box. As a result, this post may be a little out-of-date as GW may have changed the contents of the kit. I don't know if they have or not - apologies if they have.

Anyway, when I unboxed it, the first thing I thought was "Oh no! They've given me a Hammerhead in a Skyray box" - top of the pile was a sprue containing Ion Cannons and Railguns.

But no! That Sprue is there because it also contains some parts which are common to both kits, namely the burst-cannon/missile-pod drones and the underslung sensor array that goes at the front of the mini.

Ace!

Looking at it a little harder, more possibilities opened up.

The tank is, of course, built on the ubiquitous Devilfish chassis:
The chassis - sensor-pod and turret not installed.
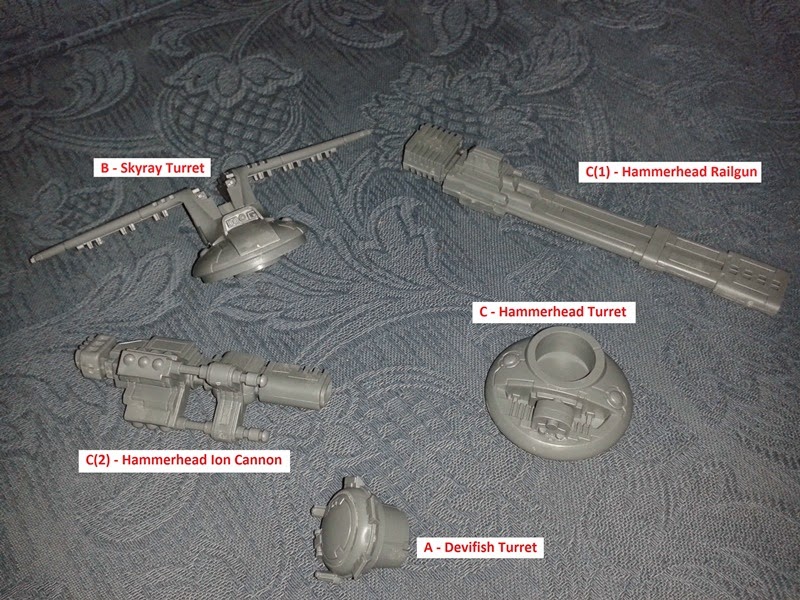
The sprues that chassis come on are Devilfish sprues. As previously mentioned the Hammerhead Sprue is in the box, and of course so is the Skyray sprue. That means that you can build all of the following parts without having to modify anything:

If you stop short of glueing them into place at this point, you will find that they will all just quite nicely drop into the hole in the top of the Devilfish chassis.

So you can have:
A Devilfish
or:
A Hammerhead with a Railgun. You can just see beyond the Railgun that the Devilfish turret drops in to the Hammerhead turret.

or even one of these:
A Hammerhead with an Ion Cannon.
or one of these (as you'd expect):
A Skyray. Naturally.

Now, if you also have a Devilfish kit or another Hammerhead or Skyray, you can probably already see possibilities opening up. You could build them all as Devilfish. You could field a Hammerhead and a Skyray by dropping the appropriate turrets into the Devilfish. The possibilities are manifold and all can be just swapped and changed without glue, from one game to the next.

But it's not all roses.

GW are not known for unstinting generosity. They stinted (is that a word?) here too.

The Devilfish normally carries gun drones. The Hammerhead and Skyray don't come with any of these so if you want to field your tank as a transport you'll need to find some from somewhere, or purchase an upgraded weapon system for your transport.

In addition, some modelling skill is going to be required. You may notice that in the above Hammerhead photos the weapons are hanging limply on the turret. They are designed to be glued in place. 

Also, the underslung turret does not lend itself to easy swapping and as the Devilfish sports a burst cannon and the Skyray and Hammerhead carry a sensor array, some work is required to make them interchangeable.

I'll cover how to overcome those problems in a later post (as soon as I've worked it out!)