Labels

Painting (372) GW (332) Games Workshop (331) Warhammer 40000 (240) Modelling (103) Astra Militarum (65) Imperial Guard (65) Epic (59) Chaos Marines (51) Warhammer 30000 (51) Space Marines (46) Tau (46) Airbrushing (44) Epic Chaos (44) Warhammer (43) Titan (39) Saga (31) Middle Earth SBG (30) Nurgle (29) Gripping Beast (27) IGTanks (25) Anglo-Saxons (24) Blood Bowl (22) Stormcrow Chapter (20) TauTanks (18) Orks (17) Wargames Table (17) Imperial Knights (16) Scenery (16) Black Scorpion (15) Epic Ultramarines (15) Frostgrave (15) Pirates (15) Age of Sigmar (13) 3D Printing (12) Warlord Titan (12) Kings Of War (10) Moria (10) Undead (10) Vampire Counts (10) Angmar (9) Death Guard (9) Forgeworld (9) Mordor (9) Quick Tips (9) Stormcast Eternals (9) AAR (8) Barad Dur (8) Battle Report (8) Goblins (8) Unboxing (8) Wood Elves (8) Isengard (7) Nippon (7) Orcs (7) Siege (7) Wargames Factory (7) Building modular tiles (6) Dreadtober 2016 (6) Sentinels (6) Skaven (6) Vikings (6) Workshop (6) Beastmen (5) Dreadtober 2017 (5) Dropzone Commander (5) Garroting'em Forest (5) Hawk Wargames (5) Humans (5) UCM (5) Warriors of Chaos (5) Imperial Agents (4) Mantic (4) Ogres (4) Sci-Fi Ruins (4) Solar Auxilia (4) Adepta Sororitas (3) Adeptus Ministorum (3) Dwarfs (3) Necromunda (3) Sisters of Battle (3) The Fellowship of The Ring (3) Dead of Dunharrow (2) Kharadron Overlords (2) Nazgul (2) Osgiliath (2) Photography (2) Renedra (2) Trolls (2) Uruk-Hai (2) Amera Plastic Mouldings (1) Armies (1) Bolt Action (1) Cities of Death (1) Days out (1) Germans (1) Giant (1) Marauder (1) Necrons (1) Perry Miniatures (1) Reaper Miniatures (1) Warlord Games (1) em4 Miniatures (1)

Monday 25 March 2013

Quick Tips: Stripping Paint


I struggled with this for years.

All sorts of chemicals of varying costs, smells and levels of toxicity were tried. I never found anything that I felt happy with the results of, or felt safe using/storing.

Until now.

You will need:

  1. A few (two or three) containers to hold enough fluid that you can immerse your models in, preferably with airtight lids so that you can't smell the fluids and to minimise risk of spillage when moving, 
  2. Some cheap toothbrushes (or similar for scrubbing paint), 
  3. Soap and water (for cleaning the models and your hands afterwards), 
  4. Rubber gloves (this can be harsh on the skin and also the smell can linger on your hands) and goggles if you have them (brush-bristles can spray paint/fluid in unexpected directions as you scrub),
  5. White Spirit (not always necessary - see below), 
  6. And the magic ingredient: Dettol! None of the new-fangled, fragranced, squirty-bottle stuff. Just the old "smells like a lift (elevator, for non-English readers), looks like apple-juice" stuff.

Method:

  • Put a 25/75 mix of Dettol/Water into your container. You can use a stronger mix for more stubborn paint if needs be, but this should suffice.
  • Fully immerse your models in the solution. This works for plastic and metal minis, but I do find the paint will come off metals more readily. I haven't tried this on Resin models, so try this on them at your own risk. 
  • Place the lid on your container and leave for 24 hours - longer if you like. I left one set of minis for months with no ill effects. 
  • In a sink or similar, wearing your rubber gloves and with a window open, remove the models one at a time from the solution (don't discard or drain it - you may need to re-immerse or can re-use it for other models) and remove as much paint as you can with your fingertips and the toothbrush. You should find it comes away fairly easily. See "A note on paints" below. 
    • If you can completely remove all paint like this, then simply wash the model clean with your soapy water and allow to dry. 
    • Some paints soften but remain very sticky and become "tar-rey". In this case, Dettol alone won't do the full job. Once you have removed as much as you can after the Dettol bath, you will need to switch to using White Spirit. Important: You will need a different approach for Metal models than for Plastics: 
      • For Metals: take another clean container and fill it with White Spirit. Immerse the models in the White Spirit and leave for an hour or more. Scrub with fingers/toothbrush and the remaining paint should dissolve and come away cleanly. Wash in soapy water and allow to dry. 
      • For Plastics: immersing plastic models in White Spirit for any length of time will cause the model to soften and pick up a slight "cauliflower ear" appearance (I know this to may cost after immersing a Space Marine Rhino for 8 hours - I now have an armoured transport that doubles as a squeezy stress-ball). You can still use White Spirit on these models, but just dip your toothbrush in the White Spirit, scrub and then wash the model clean, keeping the White Spirit on the model for as small an amount of time as possible.
  • If some stubborn paint remains, re-immerse the minis in the solution for another 24 hours (basically, repeat the process). 
  • Regardless of whether you use White Spirit or not - wash your models thoroughly with soapy water when you've finished stripping them. It's vital to get them 100% free of old, soft paint and also of any remaining Dettol/White spirit, as leaving that on the model will play havoc with the next layer of paint or glue you apply. 

A note on paints:

This method works for all paints I've encountered so far. I can't give you an exhaustive list of what those paints are, because I buy a lot of my models second-hand from ebay and the like, and I can't vouch for what paints the previous owners may have used. I have certainly successfully stripped Acrylics (like GW/Citadel, Daler-Rowney, Anita's, Vallejo, Tamiya) and spray (both matt like MattKote and gloss [most likely some sort of car spray-can]). Varnish is no obstacle either. The sprays are often cellulose-based and I suspect it is this that forms the gluey tar that requires you to use the White Spirit.

A note on containers:

Glass or plastic containers are both fine for this method. An airtight lid is vital to prevent spillage and the smell (both Dettol and White Spirits are pungent). The best advice I can give here: 

  • Don't use anything too deep or with a narrow next you won't be able to reach in to retreive your models without tipping the fluid away. 
  • Don't overfill your containers - your models are small! Also, remember to allow for the displacement of fluids when you put your models in the container - the fluid lever will rise with each one. 
  • I find that for most things the sort of plastic resealable containers you get with Chinese take-aways are ideal. You can easily get a unit of troops in one, or even a smaller vehicle like a Space Marine Rhino. 

A note on glues:

You will find that the Dettol will cause models glued with epoxy glues to come apart. The epoxy doesn't dissolve, it just seems to stop binding to the models (true for both metals and plastics). I therefore repeat: I haven't tried this on Resin models, so try this on them at your own risk. 

Wednesday 20 March 2013

Warhound Titan

This is going to be a bit of an odd blog entry - I'm writing it in March 2013 regarding a project I completed for Christmas 2008. I'm going to post many of the updates I wrote for the original website I put this on back then, hence all the historical dates you will find below.


Titan Build Project - Update 1 (01/09/2008)

Work commenced on our own Titan model in the last week of August 2008. My task is to have the model completed ready for Christmas. I have decided to build the model out of card and foamboard. I have a plentiful supply of thick (almost 1mm) card which should provide a very strong model. Pictured below is the first part built: feet.


What has become apparent whilst building this foot is that the plans are - whilst an excellent resource - somewhat incomplete. They assume that the construction material is infinitely thin (which will never be true) and don't (as is normal with folded-card models) feature any "glue tabs" - small protrusions from the edges of the templates which you coat with glue and then fold beneath the visible parts.

I will need to add the "glue tabs" as I go where necessary. No guidance is given in the plans on adding additional structural supports, strengthening joints etc. Thankfully the sections constructed so far for the foot are so small that these haven't been necessary, thanks to the thickness of the card, but larger pieces will undoubtedly need additional support which will need to be engineered in as I go (one definite piece will be the upper-ankle-joint, which according to the plans is a join between a flat card surface and the curved surface of a plastic tube and looks horrifically weak, given that it will be supporting the entire weight of the model and will have to absorb a shock every time the model is lifted and put down again).

I have experimented with glues on the build of the foot and am so far favouring the use of a hot-glue gun over PVA. It's more difficult to manage, but dries (I should really say cools) much faster and you can really blob it on where necessary.

The plans for the titan give no "details" either - just the bare structure of the model and it's main features, so I will need to add armour plates, badges and features to bring the model to life as I go (you can see some that I added to the toes in the picture below). My next task will be to add the remaining pistons, add some details, trim and add some modelling putty to tidy up the seams and then construct the other foot.

The toe-piston which has been added (on the back toe only, so far) has been made from a section of brass rod inserted into a section of steel tube, both bought from a local model store. Each toe will have two of these, either side of the toe-joint and a third connecting each toe-joint to the lower-ankle joint. The use of metal materials here adds no strength to the model - they were simply an available material.

Titan Build Project - Update 2 (09/09/2008)

Work continued on the build into the first week of September. A second foot was built to the same specifications as the first.

The metallic toe-piston was removed and replaced with a full set of pistons constructed from cocktail-sticks and the plastic rods from cotton buds. These metal rod constructions were replaced because they were too large and they were also comparatively difficult to work with - the cylinder cuts quite easily with a junior-hacksaw but the brass rod which forms the actual piston is much harder to cut. Making 16 of them (two per toe, four toes per foot) was not going to be practical. They will be used on other areas of the model, however, as larger pistons will be required (from each toe to the leg, for example).

One other note at this stage is that I've become somewhat dis-enamoured of the cardboard I've used to construct the feet from. It's very thick and therefore quite strong, but it does have it's drawbacks. Its a given that in order to fold card successfully you need to first score it with a craft knife. This particular card is very fibrous - the score-lines when folded exhibit a small "fraying" behaviour as a result. In addition to this, if you don't score deep enough, then when you make your fold the card can tend to separate (imagine peeling a slice of bread off a sandwich). I'm not at this stage planning to scrap the feet unless their condition deteriorates, but I will be giving them a coat of watered-down PVA glue to try and put a sealed layer on them that hopefully won't fray and will still accept paint.

Going forward, I'll try and do more of the build using foamboard. It's inevitable that card will need to be used, but I'll try and minimise it to areas that don't need to be folded.

Next on the plan - adding pistons to the second foot, tidying up a few uneven edges and adding some details (raised steel plates and bands etc.). Then I'll begin work on the legs.

Titan Build Project - Update 3 (10/09/2008)

I've worked so far on adding pistons & details to the feet. I'm still trying to decide how much tidying up to do - there are some obvious things (where abutting pieces of card fit together poorly with gaps between or not quite lining up correctly), but I don't want to overdo it and eradicate things that could actually form useful bits of detail. When building a model like this one which is essentially made of lots of flat sections of card, you end up with not a lot of detail, so bonus freebies introduced by folds and creases are sometimes to be preserved. In addition, the plan of coating with PVA to avoid fraying was ditched - a happy accident demonstrated that it's easy to lay a thin film of glue from the hot glue-gun along edges (lay a bead out and then smooth it flat with the hot sides of the glue gun's nozzle) which I think will give a stronger layer of protection.

Titan Build Project - Update 4 (12/09/2008)

With the feet more-or-less complete, I've started work on one of the legs. I've used plasticard for the construction, treating it essentially as I would do with thin card (i.e. Mark out the shape, cut with scissors, score along the fold lines and bend). Observations so far are that it can be treated this way successfully, but some folds can quickly become thin and fragile so I've run a bead along the inside edge of the folds with my hot-glue-gun. Some internal bracing is required as well as the finished shape could be easily crushed. For this I cut a small square of foamboard (to the same size as the cross section of the leg) and inserted into the leg, gluing it top and bottom. My first experiment looks like this (the lower-leg and armour construction):


The Shin Armour is only resting in place at the moment and will need to be removed prior to fixing in order to attach some pistons between the toe-joints and the lower leg (refer to the schematic illustration at the top of the page). It will, of course, need detailing and the upper-ankle joint needs end-caps adding.


Titan Build Project - Update 5 (17/09/2008)


Work continued last night. The orange cylinders shown below which form the ankle joint were added, then removed and some re-inforcement added inside the top of the leg segment (a small segment of foamboard just visible in the right-hand leg) prior to being re-attached. This will not only strengthen the top of the lower-leg but also give more surface area for glue to adhere to when the orange cylinder is re-attached.

There's a lot in the plans for this model that looks very weak in terms of "not falling to bits during play". Some creative thought might be required as I go on with the build.
Also added are the central toe-pistons - each toe now has three pistons in place - one either side of the toe joint and a new central piston from the top of the toe-joint which joins the leg proper. Contrary to earlier posts, this was actually made not from the brass-and-steel materials, but from more cotton but stems which were inserted into a slightly large plastic tube (salvaged from bottles of squirty hand-soap - the tube being the one that runs from the dispenser into the soap bottle through which the soap itself is drawn up).

The second shin armour section has also been constructed and both have now been fixed in place. Apart from adding some visual detail, the lower-leg segments are now complete. The only further work besides the detailing is to mount them on a base of some kind (and I will wait until the hips are constructed before I do that as I can't decide at the moment whether to build one large base which will strengthen the hip joint but make packing the model away and actually gaming with it more awkward, or build a small individual base for each foot) and re-attach the orange cylinder.
I've decided that before the orange upper-ankle is attached I will complete construction of the next leg segment. From looking at the plans, I've been nervous about the strength of the join between the upper-ankle and that segment for some time. I've finally decided to drill a large hole into the upper-ankle and insert a 10mm wooden dowel into it, then fix that through the bottom of the next leg segment. That will be easily done if I don't re-attach the upper-ankle yet, but mount it to the next leg segment first and then attach the whole segment in one go.


Titan Build Project - Update 6 (19/09/2008)

As mentioned in the previous posting, the next segment to complete was the middle leg. Once again this was constructed from plasticard (mental note to self - buy more plasticard!). My plan to secure the leg segment to the upper-ankle with wooden dowel ran aground as the dowels were simply too large (the cylindrical diameter). I modified the plan slightly by substituting a length of offcut sprue instead, which seems to have worked well.

As before the leg segment is scored, folded and glued into shape with a hot-glue gun. A bracing piece of foamboard is added inside the segment to give more structural rigidity. A hole has been drilled through the end which joins to the upper-ankle which matches a hole drilled into the orange cylinder. The sprue-length is hot-glued into the cylinder and then the cylinder is attached by threading the protruding sprue-length through the hole in the middle leg and laying a bead of hot-glue between the cylinder and leg segment before pushing it home. Finally, the sprue segment which now resides inside the middle-leg itself is smothered in hot glue to fix everything securely in place. Plasticard circles are cut to cap the upper-ankle (should really start calling that a knee) and hot-glued into place.


My next task will be to construct the upper-leg segment. This won't be fixed in place yet, however, as I want to give some thought to the construction of the hips of the model.

I was originally hoping to make the legs removable for easy packing and carriage, but having studied the plans I'm not sure that this will be possible. It looks as though it would be easier to keep the hip-and-leg assembly as one large piece, but make the upper-body removable. I'm undecided yet, but if I do go down that route I'd want to seriously strengthen the hips - possibly remodel the hip joints entirely. These are shown on the plans as short cylinders, much like the upper-ankles are, which fasten onto the waist section. I may actually decide to use a much longer tube and run it right through the waist so it spans the entire width of the model. This will likely mean remodelling the waist slightly to make it large enough to accomodate the tube. The other decision to make is regarding basing the model - it would, I think, be perfectly stable unbased, but I'm worried about damaging the feet through wear-and-tear. I will certainly build a base of some sort, but whether it will about to a small base for each foot (really just there to protect the toes) or a largee base which both feet would be mounted on, I'm not sure. The larger base would add considerable strength to the hips, but would be more awkward to pack away and game with.

More thought is required. Stay tuned.

One thing that's becoming apparent is the scale of this model - it's going to be huge! I'll try to remember to include a model or two in the next photo for reference purposes.

Titan Build Project - Update 7 (23/09/2008)

I have completed the build of the basic structure of the legs. Before I can work further on the build of the hips, I need to source some 1/2'' plastic tubing as I haven't got enough of the orange stuff left to span the entire width of the titan (see previous entry). To add insult to injury, I'm running low on plasticard and my local hobby-shop is out of stick of the grade I require (grade "20").


Titan Build Project - Update 8 (29/09/2008)

All materials shortages are over. The plasticard has arrived and I now have an abundant stock and - thanks to a trip to the local hardware superstore I have my 1/2'' tubing (well it's 2.51mm actually as we're all metric here in the UK - 2m for the princely sum of £1.58!). I also managed to pick up some push-fit connectors for the tubing which will neatly serve to give me some excellent mounting points for the weapons arms when I get to that part of the build. My intention is to build one of each of the four weapons a Warhound can be equipped with and make them removable via a slight variant on the light-bulb bayonet fitting. More details when I get there.

I decided due to:


  1. the abundance of 1/2'' tube I now have and
  2. my plan to run the hip tubing all the way through the width of the model

to abandon the requirement in the template to build the hip joint from 3/4'' tube and use 1/2'' instead. 3/4'' tubing isn't available at the aforementioned hardware superstore and would be too large to go through some of the plasticard structures indicated in the plans anyway. Another modification I have made is to build the middle portion of the "waist" in such a way as to make the two "walls" that the tube now tuns through from foamboard (which necessitated making that portion of the model from 3 separate plasticard sections rather than one, as the two joining sections were now separate foamboard pieces. If you refer to the plans p. DWG-WH-106 you'll see what I mean - I'm referring to the template in the upper left of the page, the sections marked with hatching and "A"). I made a similar amendment to the two cuboid "hip"sections on the plan. I actually cut just the four sections in a strip (from "A" through the blank, the section marked with a ring and the next blank) and cut a square of foamboard to close just one end of the box. In each of the foamboard sections (the two in the waist and the section in each hip) I cut a circular hole to accept the tubing (very tricky in the hip joints as they're barely an inch across). The tubing was first pushed through the waist, centred and glued and the each hip was added - open end towards the waist - and glued. The result is a very strong piece as the tubing that runs through the whole thing adds an awful lot of rigidity. Just for interest, if anyone is intending to copy the method, the tubing needs to be 7'' long.

So here's the picture so far with the legs attached. As promised I've included some items to scale the image - an Imperial Guardsman and a steel rule - (15cm/6'' long).

The hips have an unintentional slant to one side - not much I can do about that at this point, but I'll try and work with it for the rest of the build and see if I can exploit it to lend the model some "animus". With the legs standing basically upright and side by side there's little feeling of movement otherwise. Again there's not much I could have done about that as I didn't see it coming and it would have needed a redesign (especially of the feet) as one would have to have been bent so just toes were resting on the ground and the heel was off.

Another change (which unfortunately doesn't come across too well in the above photo) that has taken place since the last update is that a considerable amount of work has gone into adding detail to the model - a layer of additional plasticard (the black areas) have been added to the legs to represent armour plates. The shin armour has had more armour added too, but in white plasticard.

Next in the plan is to cap the ends of the hip tubes, add the model to a base and start the filling of gaps with modelling putty and adding detail (rivets, hooks, chains, insignia etc.). I'm going to try and discipline myself to do this before I start construction of the upper half of the model - I've written several times so far about filling and so on but not done any yet. the build itself's been too tempting. There are also some pistons to add into the upper-knee joints which I should have added whilst gluing the upper legs in place - they're going to be awkward to fit now.


Titan Build Project - Update 9 (18/11/2008)

A long, long overdue update. I've been busy working on another scratch-build project and the Titan was sidelined but is now back with a vengeance!

The upper carapace was next to be built. This is a multi-section part of the model - 6 pieces in all (without including the head). The main piece which runs from front to back and is basically the Titan's torso in that it attaches directly to the hips and the shoulders hang from it. It is effectively a box with dimensions approx 2''x2''x5'' - that's a large hollow on a model this size and needs re-inforcement so a large chunk of foamboard has been inserted inside. The hip spacer is shown on the plans as a 5mm deep folded-card box. Foamboard happens to be 5mm deep so for strength I used some of that, cut to shape (actually I layered two pieces to make the hip spacer 10mm deep - this was done because I intend to make my weapons removable and it didn't look to me as though I was going to have much room to manoeuver the weapons in and out).

Another variation from the plans was that I cut a length of 1/2'' plastic tube and ran it through the lower hip joint, up through the two 5mm hip spacers and into the torso section, for strength. This has added a lot of rigidity to the hip spacers which flexed a lot after the first build effort - they were almost certainly going to break apart at some point.

The rest of the build is according to the plans, with the exception of the weapon mounts. The plans here call for some fairly short (about 5mm) circles of tubing which the weapons will be glued into to be attached to the underside of the shoulders. I've made mine about 15mm deep and have fitted a bar through them across the diameter - I'm planning to make a bayonet-fitting attachment on the weapons so that they can be removed and interchanged at will. More detail about that will follow when I get to the weapons build.

One other reason that this update has taken so long is that the model had a catastrophe - I picked it up one day by the hips (before the carapace had been attached and the hips separated from the legs and it crashed to the floor, shattering into about 10 pieces, so the whole thing has had to be cleaned up and rebuilt. This actually was a bit of a blessing in that it highlighted the weaker bits of the build and allowed me to work on a minor pose problem which you can see in the above photo - one leg was flexed further than the other and the model listed to one side. Every cloud...

Titan Build Project - Update 10 (04/12/2008)

The Titan has a head. It's impossible to tell from this photo, but the head has quite a bit of detail internally. I have constructed a cockpit (with a very small amount of painted-on detail) and a crew (two WWII German Soldier models painted in "Star Wars X-Wing Pilot" style). I had taken a couple of hurried photos of the interior before sealing the canopy, but they unfortunately didn't turn out to be useable.

The only modification from the plans in the head construction was the use of a fair amount of foamboard to detail the cockpit and to add a lot of rigidity to the model, and I've also used a short length of 1/2'' tubing which has formed a sort of "neck" to assist the head in staying attached to the torso (the neck is completely internal and can't be seen and is anchored to yet more foamboard which has been installed internally to the torso and head purely to attach to the neck).

The main portion of the Titan Model is now complete. All that remains is to add some missing pistons to the ankle joint, fill in a few cracks with modelling putty and add some details. I'll then start working on the weaponry.

Better get a move on - it's Christmas 3 weeks today and I've got to get it painted too.

Titan Build Project - Update 11 (05/12/2008)

A lot of work done last night for little gain: I have added in the missing pistons and done a load of crack-filling and added the missing red caps to the ends of the hips. If I'd been less tired, then the surplus milliput I mixed for crack-filling would have been sculpted into some details (purity seals etc.) rather than becoming rocks on the base (see photo above).

The pistons were made from some carbon-fibre rod and some steel tube I bought from a local hobby shop. It was fiddly fitting the pistons in place - I ended up using some milliput pushed into the upper-half of the ankle joint, pushed the rod into the milliput which enabled me to position the piston and then not have to hold it in place so that I could use both hands to manipulate the model and the hot-glue gun. Awkward, but successful.

At this point, I can declare that the build of the Titan proper is finished. My next task is either to add detail or start work on the weapons. I'll decide which when I have my next building session. I'm not sure I like the milliput rocks on the base - they may very well get removed.

Titan Build Project - Update 12 (10/12/2008)

A lot of work has taken place between Update 11 and Update 12. The build phase is now finished, painting starts tonight. Firstly, the Titan's weapons were constructed, using the bayonet-fitting method I mentioned previously.


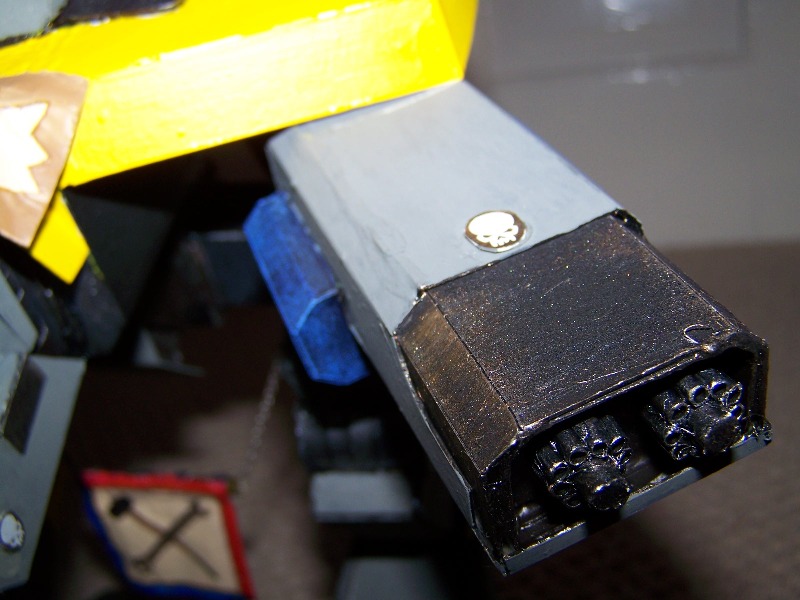
Seen above are the two weapons (from left to right) a Turbo-Laser Destructor and a Vulcan Mega-Bolter. Both have undergone slight modifications from the plans. The Laser has had the ends of the weapon enhanced (the red sections) by adding some additional tubing over the top of the black tubes to more closely resemble a Warhammer Las-Weapon. In the plans, just the black tubes are used, cut square. The Mega-Bolter has had its gun-barrels enhanced - in the plans, each barrel consists of 5 short tubes set in a "5-point star" pattern. I set the plate that the barrels are mounted to back about 1cm further than the plans and built barrels by arranging 10 x 1cm lengths of cotton-bud stalk around a 1.5cm length of steel tube. It looks more like a pair of Gatling Guns now and more closely resembles the ForgeWorld model.

In the upper picture above is one of the mounts for the weapons which accepts the connectors protruding up from the back of the weapons. This is like a reverse of the bayonet fitting you would find on a UK light-bulb and works quite well.

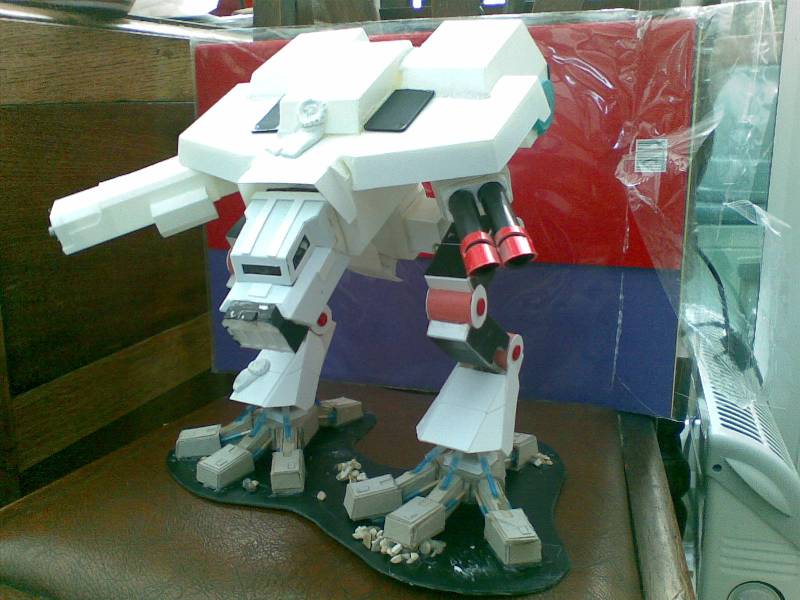
So, fully assembled, weapons in place and the finished, unpainted Titan Model looks like this:


You may have noticed that I have removed the milliput rocks from the base.

I won't be posting any more updates until the Titan is fully painted, but since it's intended to be a Christmas present, that won't be too long to wait.

Titan Build Project - It's Finished (28/12/2008)

Just in time for Christmas (I was still applying paint on Christmas Eve). Mission accomplished, job done. Phew.

The base has been augmented with some grass-flock a few painted matchsticks and barbed wire made from car bodywork repair mesh and a bit of discarded plastic painted to look like a girder. The model has had a couple of banners added - one on the carapace to cover some crummy work with the hot-glue gun (one of the problems with the hot-glue gun is that - whilst it's second to none in terms of being able to deliver loads of glue where you need it, it can also be very messy, over-delivering, dripping and stringing) and the second suspended on a chain between the legs. The banners are made from my usual formula of sandwiching some paper between two sheets of foil, glued with PVA.

I will be building two further weapons for the titan at some point but another project beckons first. This puppy needs an enemy - an Ork Stompa is next.


As a footnote - I never did get back to doing any further work on this project. Looking back at the photos (the model itself is boxed up at the moment) it's clear that a lot of improvement needs to be made to the carapace which is very flat and dull. Loads more detail needs to be added on to really perk it up. Also, the paintjob (which was a real Christmas Eve rush-job) needs some serious work too.

I'll get around to it. Eventually.

Tuesday 12 March 2013

Beasts of Chaos

Here is my Beasts of Chaos army. This army was put together on a shoestring budget and as such is rife with fixes, repairs, conversions and suchlike.

Of all my armies this is one of the ones I'm most proud of - I like the overall look and feel of them on the tabletop and whilst only painted to a "Tabletop Standard" I think they look the business, if I do say so myself.

Beasts players will no doubt spot that the army is built to the old "Beasts of Chaos" army standard rather than the newer "Beastmen" standard - this is intentional: I don't like the new Beastmen book: It would require me to rebase my Ungors, dispose of my Ogres and Giant and also gets rid of one of the unique features of the old book: The concept of Beast Herds comprised of mixtures of Gors and Ungors.

Basically, it makes the Beasts "boring". Don't want that!

The Beasts Heroes - two very old Citadel Minotaur models (roughly the same size as a Gor). I thnk these are old AD&D models from the late 1980s.

A Beast Herd

Another Beast Herd, with Herdstone. I actually have three Herds, but only two are shown here.

When you've seen one Herd, you've seen them all!

Bestigors - Citadel's first go at plastic Beastmen from about 1992.

Centigors. I don't like the Citadel centigor models, so I made my own.

Centigors viewed from a different angle. I built them from Gor/Ungor torsos and attached them to old-style Rough Rider horses. I covered the joints with modelling putty. All the right arms are magnetised for easy storage and also so they can be swapped out for standards/musical instruments/spears.

Chariots. Pretty much as supplied, but I swapped bits between the kits so that they looked different from each other.

Minotaurs. The model on the left is from the old "Heroquest" set.

More Minotaurs. The model in the middle is another "Heroquest" model. The one on the left is a conversion - left arm replaced with some Chaos Spawn tentacles and attached in such a way that the standard can be removed (it attaches to a magnet in the base and fits through a gap in the tentacles).
My Beasts army also makes use of Chaos Warhounds, Ogres and the Giant model shown elsewhere on this blog.

Wednesday 6 March 2013

Ork Village

The Ork village is constructed from foamboard. The whole of the buildings' exteriors are coated with PVA and sand, painted a buff colour and drybrushed with an off-white to give a sandstone look. Window details are either just black card or wire mesh (available from car repair centres for patching rust holes- you glue it behind the hole and then build a layer of filler up flush with the body of your car, I believe) cut to size. 


The large "Waaghh!" banner is made from layers of paper (for stiffness and thickness), aluminium foil (stays in shape once bent) and plastic carrier bag (difficult to tear) glued together with PVA, shaped to drape over the roof and hang in loose folds. Details like oil-cans etc. are from Citadel Ork vehicle plastic models or an old "WWII Battlefield Accessories" model set.
The bases here are just flock glued onto card.


The camo-netting is simply a section of the mesh bags that fruit is often supplied in, glued in place and painted with a messy green-brown pattern. Doors and trapdoors are made from black-painted card glued on to the inside of the buildings which then have strips of balsa-wood glued on, painted black and drybrushed brown.


I don't really consider these pieces "finished" - they're far too clean for an Ork settlement. I need to grubby them up and build a few more industrial looking bits, add some chequers etc. I have an Ork force to paint up but it's way down my priority list at the moment so these buildings will wait alongside that force to be completed behind other, more interesting projects.

Shattered Titan Leg

The base is made from a sheet of A4 plasticard, 1.5mm thick. To this has been glued (with a hot-glue gun) some old Citadel plastic craters (sadly no longer available - these vacuum formed craters were sold by Games Workshop back when W40K was a brand new game in packs of 5 - A4 sheets with 7 craters per sheet for around the princely sum of £4.00). The craters have been coated with PVA and sand, spray-painted black and the sand drybrushed up with layers of grey-brown. The remaining areas were painted green then coated with PVA and flocked (painted first to help cover flock baldspots). The wall was constructed from polystyrene, cut into brick-shaped pieces and painted.

The Citadel Miniatures Vacuum-formed craters

The model's base, undercoated

The model's base, painted and flocked
The Titan leg itself was a full-blown "Womble" project, made from cast-offs and rubbish. I'd had a notion to build a shattered Titan leg for a while but had been stumped about where to start. I was in the bath one day and about to wash my hair with some "Mint Source" shower gel and inspiration struck - the bottle was exactly the right shape to for the core of the leg. The front armour plate was added (thin plasticard cut to shape, the raised lip around the edge being another layer of plasticard). The main leg-stay was salvaged from the aftermath of some local kids' home-grown fireworks display in a nearby park - I think it was probably a launching tube for a rocket. The "toes" are made from foamboard with some layers of thick card on top to represent steel plates and some Poundland non-slip rubber mat on the bottom for "tread". The toes are attached to the leg using matchsticks covered with the bendy-bit from a flexible drinking straw, which has been glued into a small rubber-ball (the really bouncy kind) that was super-glued to the end of the tubing. Details were added using bits of wire, drinking straws and the plastic sticks from cotton-buds. The top of the tube was distressed by tearing at it with a pair of pliers.

The Titan Leg, unpainted

The Titan Leg - finished (Angle 1)

James (my son) and I made two of these in parallel, one for ourselves and one as a gift for Mike (which can be seen in the Imperial Guard vs. Necrons Battlereport). With hindsight, the overall effect would have been enhanced if we'd contrived a way of burying a portion of the leg into the ground, but the way we have built it (we haven't attached the leg to the base) means that there is a degree of flexibility in how the model is used - the leg can be used to adorn another scenery piece (some ruins for example) and the base used on it's own as some difficult terrain. I would also have used something more durable than matchsticks for attaching the toes.
The Titan Leg - finished (Angle 2)

Tuesday 5 March 2013

BattleReport – Imperial Guard vs. Necrons, 03/05/2008

This was a game fought between Mike (Necrons) and Dean (Guard). From the outset this was going to be a blast – a year-long wait for a grudge match! Last time, the Necrons wiped the floor with the Guard (apart from a nice mauling of one Necron Destroyer Lord). This time, with more time to prepare armies, catch up on rules and prepare tactics, it WOULD be different… wouldn’t it?

Scenery:

The table was 6x4 and divided into quarters for scenery. The players decided to put two pieces of scenery in each quarter, taking it it in turns to deploy each piece, starting with Mike who won a toss of a coin. At the end, each player would then move ONE piece of terrain to another location.

Scenario:

The roll for scenario ended up with “Secure and Control”. The mission level was “Alpha” – no special rules. Basically, we got to place 3 Objective counters on the board away from any edges. The player capturing most counters would win (using scoring units within 6 inches of the counter – no enemy units in this zone).  Victory points would not win this game, only command of 2 or 3 of those Objective Counters!

Deployment:

The Necrons won the dice roll for the “side” and chose the least crowded. They then won first turn as well. They deployed one Troop of 14 Warriors on the left flank behind the Titan Leg scenery, just to the left of the long ruined wall. In the centre, the other Troop of Warriors and the Lord deployed in a 7x2 staggered pattern to limit the damage from blast templates and flamer hits. Behind the ruined wall, just left of the Lord, a unit of 5 Destroyers deployed with a commanding view of the enemy positions. On the right flank two Destroyer Troops took up position on each side of the small wood.  A unit of 4 Flayed Ones took up position on the far left, just behind the Titan Leg scenery. The last Flayed Ones unit took up position behind the central Warriors.

The Imperial Guard had little choice but to spread across the width of the table, behind the hills, ruin and wood. The left flank comprised an Anti-Tank squad, a Rough Rider squad, a veteran unit and two special weapons team (one a sniper team on the flat hilltop, the other a demolitions team).  The centre comprised of the Heroic HQ with Commissar behind the hill with Master Vox, a platoon of Guard squeezed in behind the small wood, hill and ruins, an anti tank squad on the hill side. The right side had a squad of Ratlings in the Ruins, behind that a fire support squad and to the right of these behind the other hill, another platoon of Guard and 3 Ogryns. Phew!

Deployment as seen from the Imperial Guard viewpoint

Another view of the deployment of the forces

Turn 1

The Necron central phalanx advance to close on the central Objective counter. They get within 6 inches and claim it.  The rest of the Necron keep still. The right most Destroyers easily ranged the Guard Anti-tank squad and their powerful Gauss weapons killed all but one of the six. The last man fails a morale check and falls back off table. The next unit of Destroyers on that side also fired, annihilating the Rough Rider unit.  The last Destroyer unit in the centre rear takes out two of the six anti-tank crew opposite them. One up to the Necrons.

The Imperial Guard respond with a general advance. The Ratlings earn a place in history by killing two of the central unit of 5 Destroyers. The Necrons roll 11 for Morale and Fall back off the table. Amazing. They can’t even “We’ll be back”!


Imperial Guard Rough-Riders storm up their left flank, supported by fire from an Anti-Tank squad. Snipers take up position on the hill and (extreme right corner) The Imperial Guard Hardened Veterans prepare to mop-up whatever Necron remains their squaddies leave behind. Unfortunately they ended up looking down the muzzles of 10 Necron Gauss Cannon. Apart from the Snipers on the hill, none of these troops survived the first round of the battle.

That's Mike with the camera, by the way :-)

The Necron Lines form up for battle

The Necron Warriors and Destroyers take shelter behind the shattered remains of a scout-Titan's leg and some ruins

Turn 2

The Necrons did not move. The far right Destroyer unit shot and killed 8 out of the 10 Veteran Guard opposite them. The remaining 2 Troops made their morale roll and stood their now empty looking ground. The central phalanx fires on the Guard Platoon command squad ahead of them. The Necron Destroyers between these two units despatch the special squad of snipers on the hill top.

Again, the Guard made a general advance. They now looked weak on their left flank after taking a lot of damage from the two Destroyer units. The situation on the right flank is different though, as the Guard seem to have more units than the Necrons. The Ogryns are now passing the hill terrain (difficult going). Then, Guard shooting provides one more casualty, a Necron Warrior in the central phalanx fails its 3+ save and drops to the ground.

The Destroyers begin their inexorable advance, having lost one of their number

Flayed ones and Warriors hold their position behind the ruined Titan

Turn 3

The Necron Warrior killed last turn makes a “We’ll be Back” Roll and succeeds. He reanimates and joins his battle brothers. Such is the resilience of the Necron. In revenge, this central phalanx of Warriors stands and shoots at the Platoon of Guard ahead of them. Five Guard fall dead. The leftmost Destroyer unit moves to a position behind the central Warriors and opens fire on the same Guard unit, killing one more trooper. The Guard roll 9 for morale and stand (Good old Master Vox Caster from the Heroic Senior Officer HQ). The Destroyer on the far right finish of the two remaining Veterans and the way ahead of them is now clear.

The Guard move forward on their right flank, toward the Titan Leg ruins. The nearby Ogryns clear the hill and move forward to within 6 inches of an Objective Counter. The Penal Platoon also close in on the same objective and face off the Necron Warriors. Each player now controls one counter each. Guard shooting is better. The Ratlings and the fire support squad in the ruins kill six (yes 6) Necron Warriors in the central phalanx. Ouch! The Penal platoon kill two Warriors in the other Necron squad. The Ogryns add one more to this. The right most unit of Guard add yet another to this total. Ouch! Ten Necron Warriors down. They make a moral roll and pass. Ld 10 is a useful thing to have! In the centre, the platoon fail to kill any Necrons in the central phalanx. One Destroyer is killed in all the fighting.

The Ogryns and Imperial Guard Platoon squads begin their assault on the Necron lines

The Ogryns and Penal Squad advance

The advance of the Ogryns and Prisoners viewed from a different angle

Turn 4

The Necrons “We’ll be back” fails to save six of the Warriors and the Destroyer. The Necron Warriors take revenge by destroying one of the units of Guard in the centre. The Destroyers cause 6 wounds to the Ogryns leaving them with one wound each (a rules screw-up we became wise to after the game). One of the Destroyer units moves and targets the small wood in the centre of the Guard position. The Central platoon loses all five of its command squad this time.

The Guard respond. The Ogryns need to get out of the guns of the Destroyers – by getting to within 6 inches of the Warriors ahead of them. The Guard near these Ogryns also moves forward. They are now close to the Flayed Ones unit near the Titan leg. The Ratlings kill one Destroyer. The Destroyers pass a morale test for 25% shooting casualties. The Support fire squad fires on the central phalanx and kills three Warriors. The Ogryns fail to kill and Warriors. The Flayed Ones near the Titan leg come under fire from the closing Guard units. They take one casualty. The Unit in the small wood fails to kill and the Anti-tank squad nearby only despatch one more Warrior. The Ogryns charge the Remaining Warriors near the Titan Leg. The Ogryns win that round of combat but the Necron pass their save and do not fall back. 

The remaining Necon Destroyers, sheltering behind the cover which failed to protect them from Ratling Sniper-fire. Their revenge was swift, however, as their gauss cannon was soon to rake the Ogryns

Turn 5

This is the point where the Necron player rolls 5 (yes five) ‘ones’ for “We’ll be back” and fails to bring back any Warriors from the unit in combat with the Ogryns. The odds of this are about 7776 to one. But still they came. It is now three Ogryns with one wound each against three Warriors with one wound each. The right most Necron Destroyers “Turbo boost” down the edge of the board and get LOS to the Guard hiding behind the hill. They can’t fire this turn as they moved so quickly. The central phalanx move forward to win the centre of the board and improve their position around the central Objective counter. The Flayed ones skulking around the rear of this unit move forward and right toward the third Objective counter but do not reach the 6 inch area around it. The Destroyers nearest the Ogryns “turbo” behind the surviving Warriors just in case they break. The central phalanx kill the last of the Guard in the small wood. The Ogryns kill one more Warrior in close combat. The Flayed Ones near the Titan leg charge the Guard platoon ahead of them. The Guard loses this combat but rolls a 7 and stands. The Flayed Ones consolidate by moving into the remaining Guard.

The Guard anti-tank squad kill two Destroyers from the centre most unit with Lascannon and Krak missiles. This unit passes its morale test and fails to fall back. Ratlings kill one more Warrior in the central phalanx. The fire support squad kills one more Warrior. The Ogryns fail to kill more Necrons. The Necrons kill 1 Ogryns but they stand. The Flayed One combat results in one kill a piece – stand off.

The Imperial Guard Anti-Tank squad, just prior to being outflanked by the Necron Destroyers

Turn 6 - Final turn

The Necrons consolidate their position by moving Destroyers and Flayed Ones to the Objective counter on their right. They stay still in the centre and carry on in combat on their left. The Flayed Ones win the close combat. One unit of Guard falls back, the other rolls 2 and stands firm. The Ogryns lose their round of combat and the survivor fails to pass the moral check and falls back. The Objective counter here is now unowned.

The Guard anti-tank squad kill one of the Flayed Ones in the centre. It is not enough. They stand.

So ends the game.
 

The rout of the Ogryn Bone'ead

Conclusion: Victory for the Necrons

Necrons: 2 Objectives, Guard: 0 Objectives.

After a couple of Turns it seemed as though the Necrons could not really lose. They already had one Objective counter and when their right flank became unopposed, the second counter was really theirs for the taking. The game could have been different if the Necron left flank had crumbled earlier. They were down to two Warriors in the end. The Guard could have just grabbed one Objective counter then moved to dispute the middle one on Turn 6 – effectively drawing the game. But it was not to be. The Necrons fought well, pounding the Guard and taking out fast, heavy and elites on one flank. Some of the Guard made a good account of themselves by getting into the fray “en masse” or shooting from the cover of ruins. The real problem came with losing the Guard left flank to withering fire from the 10 Destroyers on that side of the table. Their was no cover for them to use. Stars of the game were the Destroyers and the Ratlings with their hit of 2+ and cover save of 3+.

A good game well executed and enjoyed very much. Another grudge match anyone?