I've just realised that my blog is exactly 1 year old today!
I'd like to thank all of you who have taken the time to check in on my inane witterings and cack-handed painting projects. I've learnt a lot from the comments that many of you have made over the last year and for that I'm grateful.
I had no idea when I started this off that it would be as successful as it has been - over 15,000 hits in one year is a fantastic result for me.
Thanks again, all.
Dean

Tuesday, 25 February 2014
Blood Bowl: Elves - test models
I've begun work on my second Blood Bowl team - this time it's Elves. These are old 2nd edition models and I think pre-date the "wood elf/dark elf/high elf" separation in Warhammer Fantasy. As such, I wanted to apply a colour scheme that would allow me to field them in any of the above roles.
More than that, as soon as I saw these minis in their studded boots and strappy armour, I got an unshakeable "black leather" notion stuck in my head. Don't ask why - I'll never tell.
Anyway, these are the first three models:
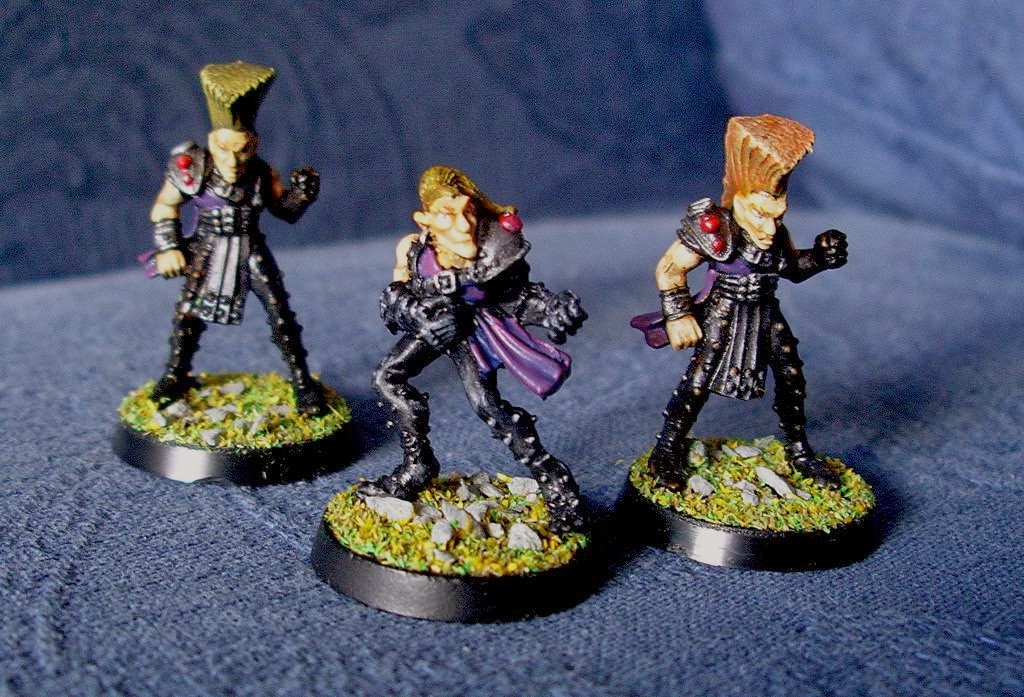
A catcher (center) and two Linemen (plastic models from the old "Kerrunch!" game set).
I'm trying to knock these out quickly - no more than 30-40 mins per model, so please forgive the "rough-and-ready" look!
More than that, as soon as I saw these minis in their studded boots and strappy armour, I got an unshakeable "black leather" notion stuck in my head. Don't ask why - I'll never tell.
Anyway, these are the first three models:
A catcher (center) and two Linemen (plastic models from the old "Kerrunch!" game set).
I'm trying to knock these out quickly - no more than 30-40 mins per model, so please forgive the "rough-and-ready" look!
Monday, 3 February 2014
Painting: Imperial Guard Valkyrie
Update: 05/03/2014 (Read down for older updates)
Well, I've had a busy time of it for the last couple of weeks. Unfortunately, not busy doing modelling or painting. Illness and family commitments took precedence, so my rate of progress has slowed.But I'm making a push for the end of this project.
In the last couple of days I've had my first go at using an oil-wash.
For those not in-the-know, oil washes are made by mixing oil paint (artists oil - not decorator's gloss!) with white- or mineral-spirit in order to really thin it down. Apply a coat of gloss varnish to the model, let it dry, load up your brush with the wash and gently touch it to the area you want to fill. Capillary action "sucks" the wash from the brush and it goes shooting along all those lines between panels and so on. Drying time is longer as you have to wait for the spirit to evaporate and the oil to dry, but the ease of application is a breeze. If you overdo it, let the wash dry then just grab a cotton bud (a.k.a. q-tip), moisten with spirit and dab off the excess.
I found as I was doing it that I was overdoing it a lot, but as I was using black paint what I ended up with was a greasy, oily-looking patina on the model which I actually quite liked! So I went bonkers and washed the whole mini, not just the panel lines. I got a nice shadowy halo effect around the raised features as a result.
When dry, another coat of gloss varnish seals it all in place and readies the model for decals.
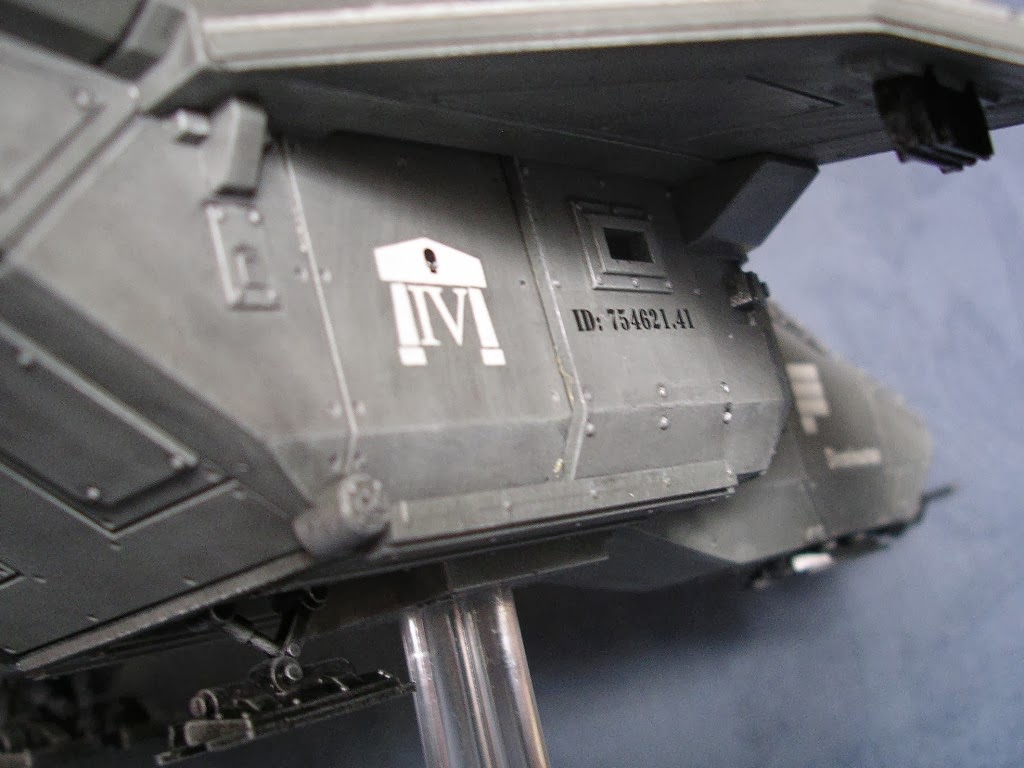
And that's where I am now: washed and decals applied. The Valkyrie is now looking like this:


My next update should be my final one: weathering the paint by adding some chipping effects. I'm going to use the same technique and colours that I used on my Baneblade to keep a uniform look across the army (I'm going to go back soon and retro-fit a lot of the techniques I've learned recently to my older IG tanks which look very, very amateurish and wouldn't sit well alongside the Valkyrie and Baneblade without being updated).
Update: 21/02/2014
It's been a week since my last update but loads has happened on the Valkyrie. |
| It's got a finished base now |

And here it is with multi-launchers and lascannon (in place of the multi-laser):

This pic shows the magnets on the weapons. The small black widget in the middle of the underside of the wing is where they attach. It's jsut had a couple of lengths of paper-clip super-glued into it:

And (my bestest most proudest achievement): I've stencilled a design onto the wings!

Next up should be oil-wash. Stay tuned.
Update: 14/02/2014
Well, I haven't been idle.The wings are now fully built and can be attached and removed as required (I can't claim any special credit for that - the design of the model lends itself nicely to a "push-fit").


Also nearly complete is the aircraft's "nose":

My next task is to build (but not attach) the canopy. Attachment of the canopy will wait until after the plane has been varnished. I'm also planning to magnetise the weapons so I can switch from missiles to missile pods and from lascannon to multi-laser. If I can, I'll also pick up some Twin-Linked lascannons so I can field this model as a Vendetta gunship.
Also on the to-do list:
- My first go at oil "pin-washing"
- Stencilling some emblems on the wings
- Finish off the paintjob of the various details (lights, handles and sensors etc.) that are dotted around the model,
- Weathering
- Basing
As always: Stay tuned!
Update: 11/02/2014
Quite a bit more work done over the last four days - assembly is underway: |
| I've attached the main fuselage to the tailplane |
 |
| The tailplane is what holds the doors on. They're designed to slide open and closed. |
 |
| Also attached are the heavy bolter pintles and the engines |
For my next update, I'll be building the "nose" of the aircraft and attaching the bolters. Stay tuned!
Update: 07/02/2014
It seems a long time since my last update - it was only four days ago!Since then I've been busy drybrushing - all the metallic parts are done:

And the grey panel-exteriors are done:

And I've begun assembly of the plane:
 |
| I'd rotated this image 90 degrees left, but blogspot seems intent on ignoring that! |
I've also done some work on the cockpit and pilots:

 |
| I'd rotated this image 90 degrees left too! What gives, blogspot? |
Still, you live and learn.
Introduction: 03/02/2014
I wish I could "stick with the programme". There I was, merrily working on preparing Blood Bowl teams and Painting my Baneblade when I got sidetracked into starting another project. Two, actually, but more about the other project later.Mike, who many years ago bought me the Baneblade model, also bought me (many years ago) a Valkyrie. I was so please with how well the Baneblade has gone, that I've slipped into "Imperial Guard armour mode" and decided to start work on the Valkyrie, even though we don't have a game of W40K planned for over a year.
My muse is upon me.
So here's the first in a series about building the Valkyrie.
For openers, I've partially constructed the model. I've decided to do something with this one that I wouldn't normally do which is to work on keeping all the parts which are designed to move (doors etc.) able to do so. I'd normally just glue them all shut for simplicity.
So aside from the partial assembly and spraycan basecoat (which is either matt black or matt grey, depending on whether the part in question is going to be a mettalic bit or an armour panel) I've been working on the interior detail for the main fuselage crew cabin.
 |
| Front bulkhead |
 |
| Roof with lights |
 |
| Side panel |
 |
| Other side panel |
Subscribe to:
Posts (Atom)