Labels

Painting (372) GW (332) Games Workshop (331) Warhammer 40000 (240) Modelling (103) Astra Militarum (65) Imperial Guard (65) Epic (59) Chaos Marines (51) Warhammer 30000 (51) Space Marines (46) Tau (46) Airbrushing (44) Epic Chaos (44) Warhammer (43) Titan (39) Saga (31) Middle Earth SBG (30) Nurgle (29) Gripping Beast (27) IGTanks (25) Anglo-Saxons (24) Blood Bowl (22) Stormcrow Chapter (20) TauTanks (18) Orks (17) Wargames Table (17) Imperial Knights (16) Scenery (16) Black Scorpion (15) Epic Ultramarines (15) Frostgrave (15) Pirates (15) Age of Sigmar (13) 3D Printing (12) Warlord Titan (12) Kings Of War (10) Moria (10) Undead (10) Vampire Counts (10) Angmar (9) Death Guard (9) Forgeworld (9) Mordor (9) Quick Tips (9) Stormcast Eternals (9) AAR (8) Barad Dur (8) Battle Report (8) Goblins (8) Unboxing (8) Wood Elves (8) Isengard (7) Nippon (7) Orcs (7) Siege (7) Wargames Factory (7) Building modular tiles (6) Dreadtober 2016 (6) Sentinels (6) Skaven (6) Vikings (6) Workshop (6) Beastmen (5) Dreadtober 2017 (5) Dropzone Commander (5) Garroting'em Forest (5) Hawk Wargames (5) Humans (5) UCM (5) Warriors of Chaos (5) Imperial Agents (4) Mantic (4) Ogres (4) Sci-Fi Ruins (4) Solar Auxilia (4) Adepta Sororitas (3) Adeptus Ministorum (3) Dwarfs (3) Necromunda (3) Sisters of Battle (3) The Fellowship of The Ring (3) Dead of Dunharrow (2) Kharadron Overlords (2) Nazgul (2) Osgiliath (2) Photography (2) Renedra (2) Trolls (2) Uruk-Hai (2) Amera Plastic Mouldings (1) Armies (1) Bolt Action (1) Cities of Death (1) Days out (1) Germans (1) Giant (1) Marauder (1) Necrons (1) Perry Miniatures (1) Reaper Miniatures (1) Warlord Games (1) em4 Miniatures (1)

Tuesday, 2 July 2013

Painting: How I paint Beastmen. 3rd and final installment

I've got a game coming up soon for my Beasts of Chaos army that means I need a few more Bestigors than I currently have.

I'm working in fits and spurts to paint up a batch of 28 models, just doing a few minutes here and there as time permits. I've always been very happy with the appearance of my Beasts, so I thought I'd share how I paint them up step by step.

It's basically a repeated application of drybrushing.

First off the models are primed with black spray. For this I use "plasti-kote projekt paint" which I buy from a local DIY shop. It's inexpensive when compared to the GW spray (currently £9.80 for 400ml can). I buy a 400ml can of this stuff for about £6.00 and it works totally fine.

Next up I drybrush the "skin" area on the models with a very dark brown colour. Again, I'm not using GW paint here - I  tend to avoid it as it's soooo expensive for such tiny amounts. I do have some from years back when I started - you'll see it in use later. Currently GW are charging £2.40 for a 12ml pot of paint (i.e. 20p per ml). I buy this stuff from a local art/craft shop for about £5.00 for a 250ml pot (i.e. 0.5p per ml). By my reckoning that works out as 2.5% of the GW price. It's thicker than GW paint and so goes much, much further too, when thinned. It's still an acrylic and washable with water, same as GW paint.
Black undercoat with dark-brown drybrushed flesh


One problem with that range of paint is that it's very limited in the range of colours. It's designed for artists to paint on canvas who will typically be frantically mixing on a palette as they go, so range isn't a requirement. No matter, as the same shop also stocks a range of hobby paints, as shown in the next step.

After the first round of drybrushing, I apply a second layer of a lighter brown to the "skin". This paint comes in 59ml pots and costs just £1. It is very similar in thickness and coverage to the regular GW paints but again the range of available colours is lower (that said there are still at least 50 colours available). Doing my sums again that means that this stuff costs 1.69p per ml, so is just 14% of what GW charge. This paint is also a water-washable acrylic, same as the GW paint.
A layer of mid-brown drybrushing applied to the flesh

Shop around!

Anyway, the "skin" is now finished, as far as I'm concerned (and so is the lecture on buying cheaper paint!) so I move on to the next area. I chose to do the "metalwork" on the model next, again just drybrushed:
More drybrushing - metal details this time

The next phase of the process is another drybrushing application - this time in a light grey colour (the exact colours used are shown in the photo below - about a 50:50 mix) to pick out the hair, fur and horns. The same shade is applied to the model's base (which was textured by applying PVA glue and some gritty sand before the black spray undercoat was applied).
Yet more (and final application of) drybrushing - light grey to pick out fur, hair and horns

I'm only aiming for "Acceptable Army Standard" with these models so I'm close to finishing. All I plan to do from this point is pick out the eyes (red), teeth (I use bronzed flesh for this - white is far too stark), the belt/butt-flap and the weapon-haft. So far I've invested about 5-6 hours into this unit of 28 models so you can see that this is a fairly rapid process so far. By my reckoning, that's about 12 mins per model so far. Going forward I move away from drybrushing to simply "painting" and then applying a one-stage highlight. Progress will be slower, but should still average out (I hope) at about 1 model every 20 mins.

The final part of the process went a little faster than I'd expected. I found when I applied the last few colours that to reach an "Acceptable Army Standard" that the one-stage highlight wasn't required - the colour itself over the base colour was sufficient.

So all I needed to do was to apply paint to:

  • Eyes (red)
  • Teeth (Bronzed Flesh)
  • Bracelets (Bronzed Flesh)
  • Belts (either black or dark brown)
  • Wrist-pennants (on the right wrist just beneath the hand) and Butt-flaps (either red, grey, dark brown or mid-brown)
  • Weapon-haft (dark brown with a Bronzed Flesh drybrush to bring out the wood-grain).

The final result looks like this:
Two models, front & back

A slightly different perspective
And the whole unit of 28 looks like this:
The whole unit
Start to finish time came in at about 18-19 minutes per model so about 9 hours for the whole unit.

These guys won't win me any Golden Daemon awards, but they will look splendid on the battlefield with the rest of my  my Beasts of Chaos army

Wednesday, 19 June 2013

Siege Equipment: Mighty Fortress Castle. Part 5 - the even finaller than the last post, post.

Part 1 - Damaging Walls:

(Other parts of this post are found further down)

Following on from my posts about the construction of my Siege Towers, I've started work on the natural enemy of every Siege Tower ever constructed: a Castle!

It might seem an odd way round to do things (Towers first, Castle second) but there was good reason. I've got a Siege game coming up this summer so there's time to prepare both with not much rush-factor. I've had one of the original Citadel "Mighty Fortress" sets for a very long time - getting on for 20 years or so but the paint job I applied to it back then was very basic (but usable in a pinch so if I did run short of time I could get away with it as it is).

Also, I wanted to be able to be a bit more flexible with the castle construction for the game than the Mighty Fortress set allows, so I've been on the hunt for a second set. I recently picked one up from ebay so I've got everything I need now to get started.

Each set comes with 4 x Towers, 4 x Wall sections and 2 x Gate sections. As I said I have two of these so I have four Gate sections. No castle on the planet is ever going to want four Gates, so I decided early on that I was going to sacrifice two of the Gate sections in order to be able to model some "Breached" and "Collapsed" wall sections.

Here's a picture of the first Breach - I used everything from a Stanley blade to a hacksaw to chop this thing up - it's only made of Polystyrene Foam but it's a dense, solid block so it took some hacking!

The arch section is shown here back in place in the wall to give an idea what it looked like before I started.

The arch section will get chopped up later in order to form a "collapsed" section and some rubble and suchlike.

According to the Warhammer 6th Edition rulebook (which is as far as I can tell the last place a Siege rule supplement was published) I need to be able to represent various stages of damage:
  • Ramparts Destroyed (I feel something magnetty in the offing there),
  • Breach!
  • Collapse! 
and various stages of damage to a Tower too.

Part 2 - Damaging Towers:

I'm generally getting better at hacking. Since my first post I've successfully carved up another Gate section to make the pieces for another Breach and have also chopped the "arch" section into rubble that I'll scatter about the place to make it look like these walls have genuinely fallen down rather than just had a bit "teleported away".

I'll not bother you with photos of more broken polystyrene until it's all painted up - you've seen a breach above and one hole looks much like another.

I've applied the same techniques to create a partially collapsed tower (the paintjob on this tower is an old one I did a looong time ago and will be overpainted later):

I've pretty much settled on the technique I'm using:

  • Hacksaw a jagged line from top to bottom,
  • Use an Exacto-blade to roughen up the cut lines to give texture,
  • Then along the line of the cut, use the Exacto-blade to remove the occasional stone block.
I applied the same techniques to the off-cuts in order to produce my "rubble" which is chunks ranging from a single "stone" to complete sections up to about 1.5'' long by 1'' high to represent bits that fell but didn't shatter. I've used a pointed-tool to make more of the wall brick-pattern in any flat surfaces that were created by cutting.

Part 3 - "Smash it up!"

As I mentioned above, there are a number of different types of damage to represent. I've built two sections to represent a "breach" in the walls:

and
Both of these sections we made by taking a slice off the bottom of the wall sections which were created as described earlier and gluing them (using 2-part Epoxy) to a thick rectangle of plasticard cut to the same dimensions as the wall-section base. More epoxy was used (along with a host of tailor's pins) to secure a lot of "rubble" in, on and around the wall sections. Some cuts were made here and there to represent fractures (most easily seen in the upper picture on the right-hand-side) and a few bits of balsa-wood and snapped matchsticks glued in place. Everything else was textured with play-sand and a few bits of fish-tank gravel.

Another section was built to represent a complete collapse using the same methods:

Part 4 - Damaged Ramparts

One of the damage types the 6th Edition Siege rules call to be represented is damage to the ramparts which means that troops on that castle section can still move around but can't gain cover. Theoretically this can occur on a tower or wall section, and a wall section can either be a regular wall or a wall with a gateway in it.

Now I don't have enough castle pieces available to sacrifice that many sections over and above what I've already sacrificed on this project, so I needed to devise a way of making damaged ramparts that could be swapped out for regular ramparts.

Since the model is made from polyfoam, I decided to cut the ramparts from my nominated sections - it's a solid model with no "space" within and as such both the walls and the ramparts I removed would be quite sturdy even when chopped up. My first attempts to do this were with a hot-wire cutter which were, frankly, disastrous. The HWC cut through the castle easily enough but I found it impossible to maintain a neat, straight cut along the whole length of the section I was removing.

I opted in the end to use a blade for a snap-off DIY knife, but without the handle attached. This gave me a very flat blade that was about 8'' long and very, very sharp. I could lay it flat on the walkway section of the ramparts and slide it along cutting deeper into the back of the rampart wall with each pass. It didn't take long to work all the way through and left a neat cut (and several not so neat cuts in my fingertips!).

I then cut some plasticard rectangles to fit the gap and drilled some holes through them. These holes would ultimately hold gaming magnets, but I first used them as templates to make marks on the top of my castle walls and the bottom of the excised ramparts. These were bodged into holes and magnets inserted into all three pieces (superglued into the plasticard and epoxied into the castle/ramparts):

I then decorated the plasticard section with a bit of gravel and some polystrene chunks to represent the remains of the battlements - here's what it looks like in place:

And swapped out for the battlements:

The same principle was applied to another wall section and a gate section - I won't bother showing these until some paint has been applied. I also did one tower:

The polystyrene isn't as sturdy as the polyfoam and looks a bit "cloudy" in these photos, but the cellular structure of it does give is a "damaged stone-y" sort of texture and I'm hoping with a layer of paint over it it should look OK.

Well, I know I'd promised that the last update I did on this build was going to be the last one, but something was bugging me.

Part 5 - Ruined Tower:

I'd built a ruined tower section which I really didn't like. In fact I didn't like it so much I'd actually not shown it before, even though it's been "finished" for a few weeks. Here it is now:

My plan was to try and texture the walls, but the problem was that the polystyrene I'd used wasn't up to the job. There are different grades of "expanded polystyrene" and the one I'd used to build the tower was very soft (I suppose the gradings are all about just how much the polystyrene has been expanded by). This stuff was made of small "balls" or "cells" which were about 2mm across and quite "squashy". I became concerned about how much abuse it could withstand and also how I could go about adding texture to it. I was planning to just draw on a wall-pattern with a pen, leaving indentations in the foam, but it didn't work - the cells ruptured and came away.

So I trashed it and started again. This time I've used foamcore - I sliced off one side of the card outer leaving just a card back and the foam centre. Happily, I made a ham-fisted job of it which actually left me with a nicely undulating surface which serves to add to the detail. Some work with a ball-point pen and I now have a sturdier, textured tower:

Happy days.

I'm going to start a new post shortly on my adventures in painting the castle. Stay tuned.


Wednesday, 5 June 2013

Unboxing: Oni Night Haunter

One of the frustrating things about collecting a non-standard army from an unofficial army book (see my "Fan-Written Army Books" post) is sourcing the miniatures.

When I decided to begin collecting a Nippon army, it was fairly straightforward to find models from Perry Miniatures (see also "Unboxing: Perry Miniatures Samurai") to fill in some of the Rare, Special and HQ army slots. Also quite easy was finding the Wargames Factory models required to fill most of the Core slots (See also: "Unboxing: Wargames Factory Samurai", "Unboxing: Wargames Factory Mounted Samurai", "Unboxing: Wargames Factory Ashigaru Yari Troops" and "Unboxing: Wargames Factory Missile Troops").

But Warhammer is supposed to be a Fantasy game, not a Historical game, right? Right! So I want monsters and wizards. That's not so easy to do as those models are rare.

When Kensei get up and running (not sure how long that will take but their crowdfunding is complete now) I might be able to buy some of the more esoteric minis, but for now I'm left to scrabble around a bit and just "see what's out there".

I like Ogre-sized models so I was immediately taken by the "Oni" entry in the Nippon army list book. Oni are variously referred to as "Japanese Dae
mons" and "Japanese Ogres" if you look for them on the interweb. They're definately treated as Daemons in the army list as they are "unstable" and cause "magical attacks".

I found a good match for the illustration of Oni in an old D&D Miniature called an "Oni Night Haunter" and I fairly easily managed to pick three of these up from www.rpgminiatures.com for about £3.00 each.

They come pre-painted and are moulded in one piece out of a plastic that's soft and pliable. You won't snap these guys but you may find paint flaking if you abuse this property.

I've photographed the model next to one of the Perry Ashigaru and also next to a GW Chaos Bestman so you get an idea of the scale.

The paintjob shown on the model is the pre-painted effort - I'll certainly be re-basing and re-painting the model (but I do like the white hair so I'll probably nick that).


Tuesday, 28 May 2013

Unboxing: Perry Miniatures Samurai

In order to round out my budding "Nippon" army, I've purchased a few models from Perry Miniatures.

Perry Miniatures are an independent company owned by the infamous "Perry Twins" - two of the creators of  many, many Citadel Miniatures. For anyone interested in what they look like (the twins, not the miniatures), their photo appears in the original "Warhammer Siege" rulebook.

Anyway.

I don't know if they're still working for Citadel/GW or not, but their own company "Perry Miniatures" is currently making historical models in both plastic and metal. The Samurai range is only available in metal.

Needing among other things, some Ninja, Monks and a Daimyo, I decided to order some of their products.

The ordering process itself was simple enough, communications were good and the goods arrived in a very "rattley" taped up cardboard box within a few days.

Slitting the tape and opening the box revealed: More boxes! And the reason for the rattle.

And that's how there were - totally loose in the box. No additional packaging. Now that's not actually a problem as far as it goes, as each of the individual cardboard boxes is well packaged in itself. Each is taped shut and contains a cotton-wool backing and the miniatures you've ordered:

I'll show each of these sets one-by-one below, but just a general point on packaging. I hate excessive packaging. It inflates postage costs, means my recycle bin fills up faster and there's obviously more waste. However, I think these guys have gone slightly too far the other way.

The lead these models are made from seems to be quite soft, and there were a greater amount of bent swords and whatnot than I was happy with here. A bit more room in the boxes would have helped, I think.

I ordered two sets of Monks with Naginata (halberds):
The Naginata are clearly separate and need gluing into place.

Two sets of Ninja:
Ninja - 5 standing and one lying down (crawling, I guess, or suspended from a wire, Tom-Cruise-style). 

One set of Mantlets:
The set contains 6 Mantlets - I've only shown three here. These are really intended just to add to my "Siege Equipment" roster so you'll probably see them painted up on another blog post soon.

One "Flaming Arrow" (that's the Army list name for the item - can't remember the Perry name for it.):
This set contains the cannon (1 piece), 4 crew and 2 large Mantlets (only 1 shown. These will also migrate to my Siege equipment posts soon).

And a Daimyo:
The Daimyo is mounted...

...and comes with 2 standard bearers and a Samurai.

You'll notice from these hasty camera-phone pics two things:
  1. The models are on bases which are moulded as part of the models. The legs are quite slender so I'll probably just glue these on top of slottabases rather than removing them and trying to fit pins in. The moulded bases are thin enough to hide.
  2. Flash! It's been a long time since I've seen metal models with this amount of flash and mould-lines. It's a real shame as the models themselves really do look lovely, but they will require a deal of clean-up which may in a few places cause a loss of details.

My only other niggle is with the Ninja sets. I have two sets of these both containing identical models. That means I have two Ninjas lying down. Not all that useful. I have thought about mounting them on 40mm bases and using them as couple of "unit fillers" representing 4 models, but the Nippon rules state that the Ninja unit can skirmish so that might play a little strangely. I'll give it some thought.

Minor issues aside, I'd still have to rate these models as good value for money - you end up paying (not including shipping) just over £1 per model which is extremely cheap for metal 28mm minis. It's way cheaper than GW plastics! 

All told, these are a good buy and I'd recommend them.

Wednesday, 15 May 2013

Siege Equipment: Siege Towers - Finished!

In preparation for a Warhammer Fantasy Siege game that I have coming up soon, I've been working on some  projects to ready some siege-specific equipment.

This post covers the first of them: Siege Towers.

Siege Towers are a vitally important part of siege warfare. Being basically a multi-storey shed on wheels, it allows attacking troops to approach a fortress with about as much cover as you could hope for on the battlefield. Please note: all photos in this post are just mobile phone snaps and therefore not the greatest quality. When I field these models in battle in a few weeks I'll endeavour to take some better pics.

This is the finished product:


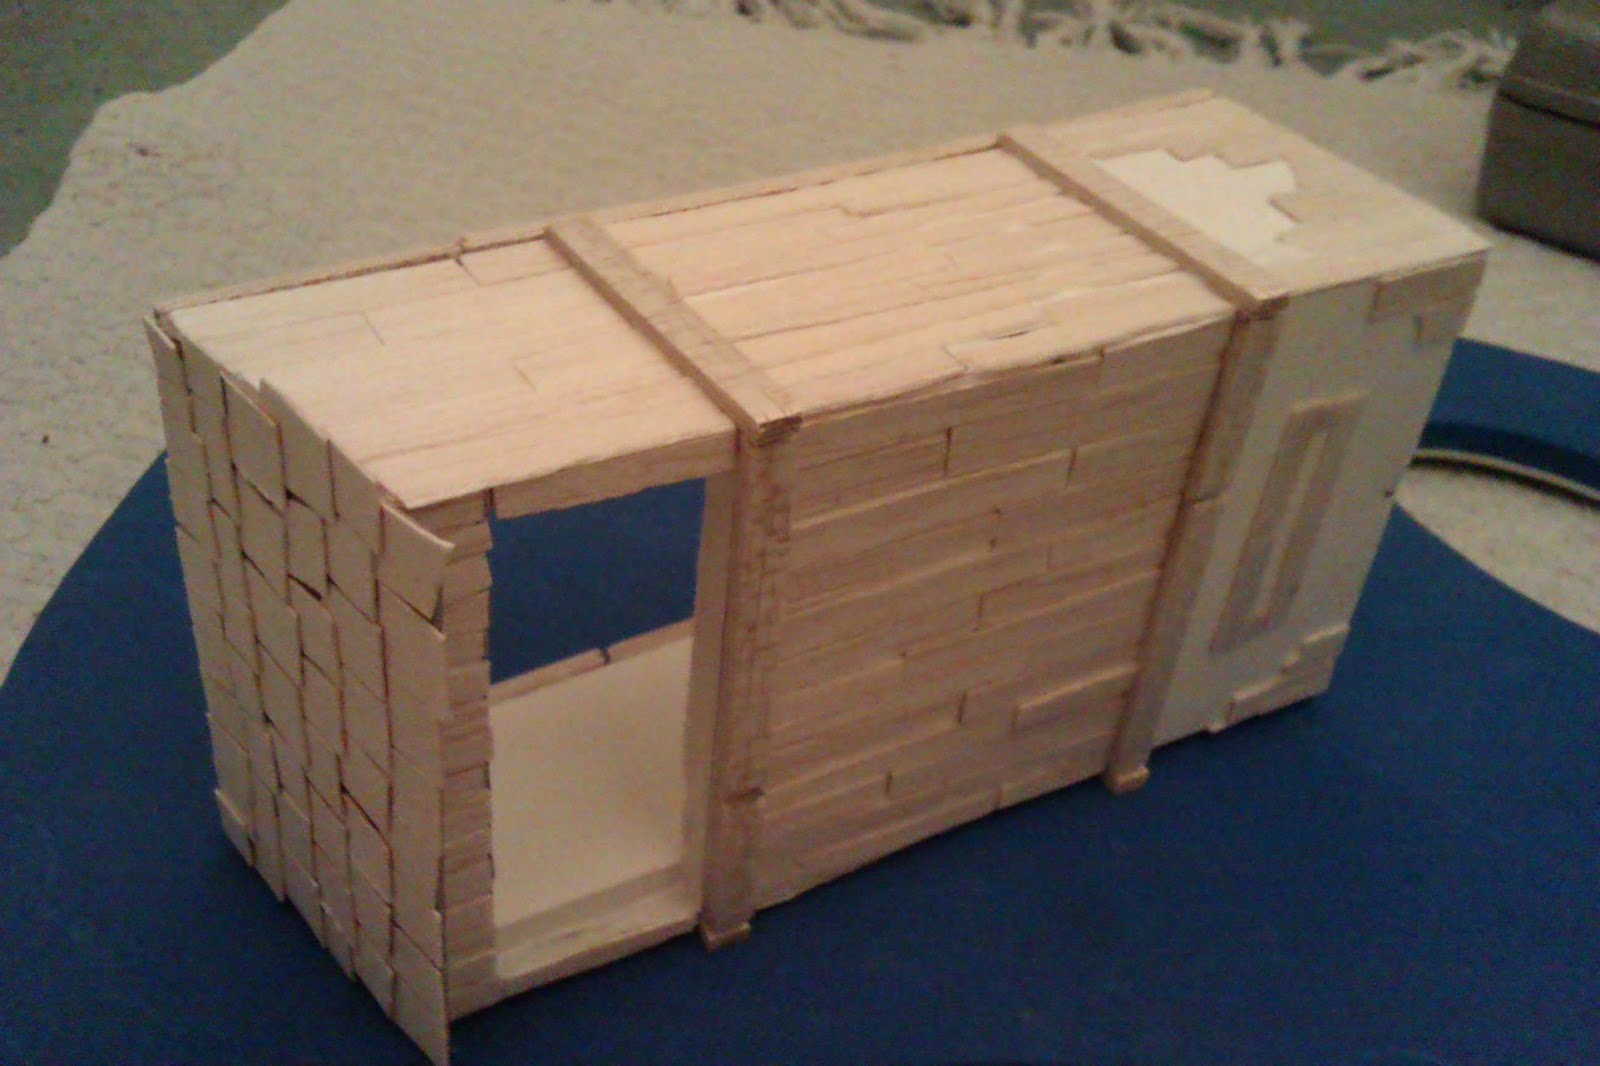
I started building mine by creating a framework from foamcore. I'd measured up the height of my castle walls (I have the old styrene Citadel "Mighty Fortress" set from circa 1990 - I'll cover painting and battle-damaging that in a later post) and attempted to create tower pieces that were going to be approximately the right size. There were some guesswork and unknowns going in as I was missing a key component: Wheels! Without knowing the size of my wheels (more on them later too) I couldn't be 100% sure of the height my towers needed to be. At the end of the day, though, it doesn't really matter if the scale is a bit off - these models are only representative of troops/fortifications/equipment at the end of the day.


I'd decided to build three towers - more than I need for the upcoming game, but who knows what games I'll play in future. Be prepared!

The roof is just a rectangle of thick card; the walls and base and the levels that will be inside will give the model all the strength and rigidity it needs (I hope).

No siege tower that ever took the field for real was ever built from foamcore - wood is the material of choice so I clad my towers in balsa. I used a very, very thin sheet for the majority of the planking, very roughly cut. I also used a slightly heavier-grade "rod" to form "beams". The roof tiles are just rough rectangles of card (a cereal box) overlaying each other.

Now, any good siege tower needs a way that the troops within can exit onto the ramparts of the castle and storm the walls. This is where things get tricky - opening doors need hinges of some sort. After a few minutes musing (I don't like to think too hard about anything) I came up with the idea of just using gaffer tape (duct tape or carpet tape are pretty much the same thing). It's strong, flexible and very sticky so wouldn't come loose. I added a couple of staples into the section that covers the foamcore front wall just for a bit of extra strength, but they really don't add much.

The door itself is just a bit of thick card. The chains were sourced from a local budget fashion shop - they're harvested from some very inexpensive costume jewellery. The attachment points for the chains are just made from paperclips which were cut down, bent to shape, inserted through the door/side wall and gaffer-taped into place.

The door itself is then covered with more balsa planking.

Some platforms were added inside the towers and cladded with yet more balsa. I then used some of the heavier-grade balsa I mentioned to cover the edges of the foamcore.

The next thing I needed were wheels.

Bearing in mind that after these towers are complete I'm also going to be building some battering rams which will need four wheels each and that these towers will need six wheels each and I'm building three towers and two or three rams, that's a lot of wheels (26 or 30 depending on how many rams I build).

There was no way I was going to get that many wheels from "bits" suppliers, certainly not at a reasonable cost. Then I remembered a purchase from many years ago when holidaying in Cork, Ireland. I visited "Prince August" - a manufacturer of miniatures and moulds for miniatures. Among other things I bought was a mould set for a stone-thrower. They've got wheels!

A few minutes hunting in the loft and I found my kit: moulds, some white metal, a melting pan and some grippers for holding the moulds. Brilliant! I still had a problem though. The melting pan is minuscule - way too small to use on a gas job like in my kitchen. Solution: a single electric job from Amazon for about £15 including shipping. Still cheaper than buying wheels AND I could use it to make other models on too.
The Hot-plate

Kit assembled and work begins. An hour later and I have plenty of wheels, parts for stone-throwers for my Dwarfs and one burnt finger. All the excess bits of stone-thrower just get re-melted to make enough metal for the next casting.

A mound being held closed ready to accept white metal

Half of a stone-thrower complete with wheel (top)
Before attaching the wheels I decided to add some detail. I'd added small features like extra bracing-planks at angles across the upper parts of the towers in random positions, covering imaginary damage-holes and so on. I'd also cut a few short sections of card to add some "metal plates" and strips here and there. Another card strip went across the leading edge of the front hatches to represent a metal edge-piece.

As a last bit of detailing, I decided to add some animal skins and sections of mail made from Milliput to the lower sections of the towers. My "prototype" had had large areas of blank foamcore left for that reason - I didn't leave blanks on the other two for two reasons:

  1. Laziness
  2. It occurred to me that the balsa would glue well to the card on the foamcore and give the Milliput something to "key" to.

Anyway, I added rough shapes of varying sizes and textured them as best I could to make a variety of different finishes, using a Citadel sculpting tool, a knife-blade, an old toothbrush and some dentist picks (dirt cheap off ebay and very useful).


Next I was going to need ladders. This was undoubtedly the least fun part of the build. I originally tried to build these like "real" ladders with the "rungs" (matchsticks) inserted into holes drilled into the balsa (heavier-grade) side-pieces. Far too fiddly. Gave up.

I eventually just taped the balsa down and glued matchsticks at regular intervals. When dry I snipped off the excess with sprue-cutters.

Then it was assembly-time - attaching the ladders and wheels to finish the build. This was the easy bit - I PVA-glued some balsa (heavier grade) to the base in order to create "channels" that I could insert the wheel axles into. When dry, I hot-glued the axles (some plastic rods from my local modelling shop) into the channels and glued the wheels on.

The ladders were PVA'd and pinned into place and "build done".

So far, I'd considered the build of this lot to be quite laborious. All that balsa cutting, trimming and glueing had taken quite a while.

I now consider that to have been the fun bit, when compared to the tedious drudgery of basecoating them!

For convenience(!) sake (i.e. being too lazy to get my airbrush out) I'd elected to brush-coat them. I couldn't use a rattlecan primer as it would have dissolved the foam in the foamcore. Brush painting the base black on took an age and was difficult to get into all the nooks & crannies too. Also a mistake was attaching the ladders before I painted.

Anyway, I've got the wood drybrushed to my liking and have also done all the "metal" bits (though I think I'll paint some rivets on to make them a bit more interesting). All that's left is the animal skins and the roof.

And I'm done! A few layers of progressively lighter blues applied to the roof tiles to make them look like "slate" and some drybrushing on the modelling-clay animal skins and mail cladding and a bit of varnish and I hereby declare this project "closed".
The finished towers

A different view

Roof detail
Now I need a castle! I feel another project coming on.

Thursday, 9 May 2013

Unboxing: Wargames Factory Mounted Samurai

Here is the fourth and final installment in the "Unboxing" series on the Wargames Factory "Rising Sun" range. This time it's the "Samurai Cavalry" box.


Unlike other boxes in this series, this set contains not 25 models, but 12 (fair enough as they have to be supplied with horses). The models are based on 25mm x 50mm bases so fit nicely into Warhammer games.

Riders and horses are supplied on separate sprues (which all still stack nicely - sorry if you were expecting to get away with me mentioning that this time) with six riders or six horses on a sprue. So four sprues for the models and a further sprue for the bases.

There's a bit more available to the Mounted Samurai in terms of weaponry than in the infantry set as they can  be equipped with Katanas, Yari or bows (bows did not feature in the infantry set). The parts seem to be easily interchangeable, so I don't see why you couldn't add bows from this set to models from the infantry set if you wanted.

The horse sprues are unremarkable - they contain the bits to make some horses. Not much to say, other than to point out the large, spherical items on the right of the sprue as pictured below. Apparently, these represent large leather bags that the Samurai would mount behind them and inflate with air. These provided an ingenious, lightweight armour from missiles being shot from behind them. After being pierced once or twice they might deflate, but otherwise formed an arrow-proof shield that weighed very little. If playing the "Nippon" rules, I guess these could be used to represent "Horo Cloaks".

Once again, the models are of a very high quality though are a little smaller then you'd expect in a Warhammer game. They're certainly great value at £16.00 for 12 models.

All in all I'd have to give this series of models a big "thumbs up" - my only issue is that you can really only field your rank and file from these sets. There's nothing you can use for your HQ, Specials or Rare troops.

In the near future, I'll hopefully be picking up some models from other sources which I'll use to grow my fledgling Nippon force and will report in on them.