
Update 9 - 11 February 2014 (please read down for older updates)
Since my last update I haven't actually done any new work on the model, but I have been asked to post a few more photos by tankboy145 on the dakkadakka forum. So here they are!I was having a "bad camera" day. I can't lay my hands on my mini-tripod at the moment, plus for some reason "Macro mode" on my camera stopped working part way through. Time to reboot it, I think.


I am going to "dirty it up" at some point, but I have more IG armour to work on before I do so. I'm currently building a Valkyrie and have a Leman Russ and a platoon of Sentinels to do. I also want to bring the weathering on all my other IG tanks up to the same standard as it is here. Then I'll "dirty them all up" as a batch.
Update 8 - 28 January 2014
Since my last update I have applied decals and experimented with weathering and trying to achieve a chipped paint look. I wrote about my experiment here, in case you're interested in the technique.I found, however, when I applied that technique to the model that "less is definitely more". In my experiment, I was working with a very small item - just one sponson from my bits box. When the technique was extrapolated to cover the entire Baneblade, I basically ended up with something that looked "leopard-spotted". Not good.
I went back and greyed out almost 50% of the effect afterwards.


I'm mostly happy with the results. Not 100%, but mostly.
Next it's experimenting time again, this time with weathering using pigment powders. Wish me luck!
Update 7 - 24 January 2014
The main painting phase of this project is now done. The last few details (hazard lines, gun-barrel nozzles, headlamps, searchlight and the re-attachment of the broken pintle-stubber) are all complete.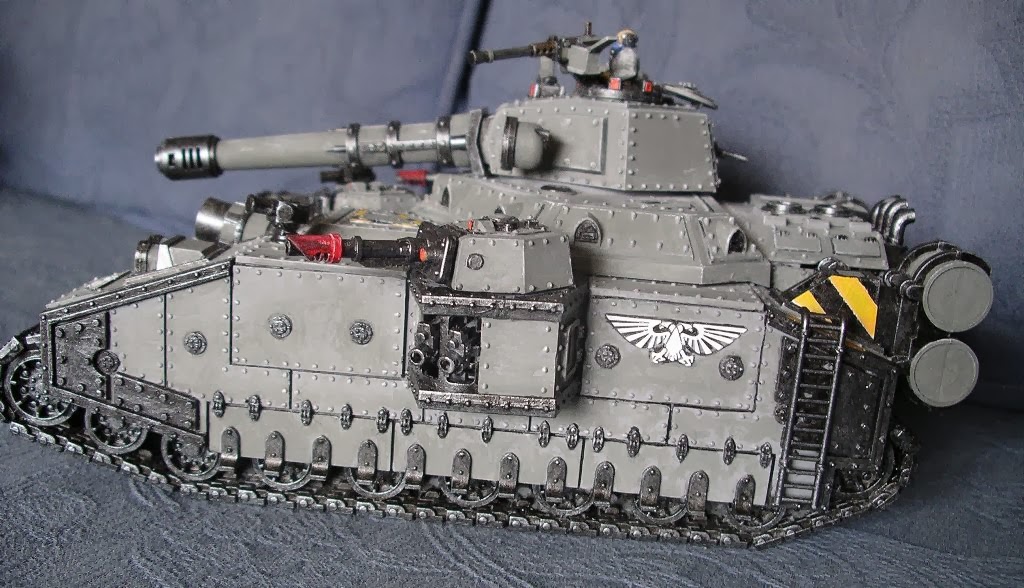


Thanks again go to Dave Weston for his blog post entitled "The most important rule of painting...". It helped a lot. I was really not happy with this project a while back but now am loving it to bits. It's definitely turned out to be my best effort at a tank so far.
Update 6 - 22 January 2014
Since my last update I've been working on "details". For the most part this refers to the various sensor lenses which are scattered about the tank, a few small corrections to bits I spotted where drybrushing went awry and painting the tank commander. I've also re-attached the missing top-hatch behind the commander.These two pics show the commander from front and rear, as well as numerous sensor lights

 |
| The top hatch can also be seen here |

For my next update I'll be re-attaching the commanders stub-gun, painting up the spotlight and headlights and working on adding some hazard lines (which I'm really looking forward to!)
Update 5 - 20 January 2014
I completed the base-colour phase of the job at the weekend; laying on lots of metallic black to the turret's metallic areas, drybrushing them up with a little silver paint then laying down all the grey colour so the whole tank has a uniform finish now.I also went on my last seek-and-destroy mission looking for bits of my earlier "not enjoying this so just slap it on and see where it goes" stage that were still hanging around.
Then I broke new ground on a tank model for my Imperial Guard army. I mentioned in my "Interlude" grumble earlier that I'd tended to stop at the flat, base-colour phase on my IG tanks, but that whilst painting up the tanks for my Marines I'd made heavy use of drybrushing. I followed that path with this tank and gave the whole of the grey portion a light drybrush with white paint to pick up all the edges, rivets and angles.
I think it looks a lot better for it. I'll be doing the same with my other tanks in due course.
So the next part of the job will be finishing off all the details like the tank commander, the spotlight, repairing the broken autocannon, colouring the sensor lenses and adding some hazard lines and decals and whatnot. Then I'll gird myself to break new ground again with some weathering.


Update 4 - 16 Jan 2014
The first thing I've done in this update is to re-organise the whole layout of this post. It struck me that if you were a regular reader of this post that in order to see the latest updates to this project you needed to go to the bottom of the thread and scroll back up, so I've reversed the polarity and added the latest info at the top and re-ordered all the rest.What I've mostly been working on is laying out the grey and dark metallics in the area around the fuel drums at the back of the tank. That completes all the "base colour" work on the main hull and brings the whole of the main body of the tank into line, leaving just the turret to tend to before moving on to detailing, highlighting and then weathering. And more error corrections, of course (I find taking photos of my work shows up all sort of "wrongs" that you just don't notice with the naked eye).
I've also removed more silly missiles that my son glued on when he built this model. He'd positioned them in such a way that if it were real and they ever did launch the backwash from the rockets would toast the fuel-cans. Not ideal. Lastly, I painted and re-fixed the cowlings covering the engine-y bits at the back. I mentioned in "Update 1" that I'd removed them. In the interest of complete honesty: "I broke them off due to ham-fisted handling of the model". I didn't like that they'd been glued half-open when built anyway.

More news as it comes in.
Update 3 - Jan 15 2014
I turned my attention to completing the "Gothic" portions of the rear end of the tank and doing a seek-and-destroy on any other bits of sloppy work that had been ruining my enjoyment of this model. I found quite a few and am certain that there's more to find yet. It's such a big model and - for an Imperial Tank - has a lot of details and nooks & crannies. I'm sure my hasty brushwork in the early stages of painting this behemoth has left imperfections that are still to be found.I have to say that the Gothic section at the back of this beastie was - compared to the rest of it - a joy to paint. There are details there I could get my teeth into and it was very pleasant to be able to depart from the extremely limited palette that has been the norm for the rest of the model (literally: grey, white, metallic black & metallic silver. Nothing else).

I did have one small problem back there - there is a small (grey) pair of hatches with winged-skull motifs which had had almost all the detail on one of the skulls eradicated by the spraycan primer so I had to try to just do a paintjob on the skull that looked the part.
Next up will be the fuel barrels either side of that section.
Update 2 - Jan 14 2014
Well, after my whingeing "Interlude" from a few days back I decided that if I wasn't going to fall into a complete torpor on this model and end up giving up again I'd better get back on the horse, so to speak, and get on with it.This was in no small way inspired by a blog post I read entitled "The most important rule of painting..." and I'd like to thank the author, Dave Weston, for his post. It helped a lot.
I went back and reviewed the work I'd done and decided that it was the work rather than the approach that I was unhappy with. I've stuck with the plan, done a fair bit of tidy-up on the sections painted so far and made some further progress too.
I've continued working on the main hull of the tank. There's still a small amount more tidy-up to do, but I've addressed a lot of the details I wasn't happy with in the previous update and continued to work my way "up" and "back" on the tank, covering the elevated hull section between the main turret and the hull.


That leaves me needing to do the rear of the tank (which has all the exhausts, fuel drums and an odd sort of cathedral window doohickey) and the turret. Once that's done, this tank will be at the same point as the other tanks in my army.
Trouble is, I want to go further than that. As I mentioned in the Interlude above, I'm not happy with those tanks and need to move them up a level, so I'm trying to work out how to do that. Weathering is a must, but I don't think will be sufficient on its own. I'm thinking along the lines of some drybrushed highlights and some camo. Decals too, of course.
I'll continue to muse, cogitate and ruminate on the matter whilst I complete the process of bringing the Baneblade in line with my other armour and then see where I go from there.
Interlude: Frustration!
I'm finding the work on the Baneblade really frustrating.When I first built my Imperial Guard army, I was comfortable with painting troops, but had very little experience with tanks. All I'd done at that point was a Rhino and Land Raider for my Space Marines (now both stripped and repainted).
The big, flat surfaces were very off-putting. The approach I used was very naive - spray it black and then brush-paint each panel individually, leaving the gaps between panels black. That is literally *it*. Nothing else was done apart from drybrushing the metallic bits in Chainmail/Mithril Silver.

That approach got me through two Leman Russes, two Chimeras, a Hellhound and two Sentinels, but I was never happy with it. It was never going to work on a model the size of the Baneblade though. Too many panels. So I decided to "reverse the polarity of the neutron flow" as Jon Pertwee's "Doctor Who" might have said. Spray it grey, paint in the gaps in the panels in black. Touch up the panel edges where I'd gone over into the grey areas with black paint. A problem appeared immediately: they grey paint I'd primed with was a very slightly different shade when sprayed than when brushed, so the corrections to the panels were obvious. I decided to make a feature of that by painting that grey in a random, blotchy pattern all over the panel. It added a bit of "wear" to the panels, I guess, but not in a way I really liked. However I'm somewhat stuck with it and as more of the model gets done, it looks less and less odd as it appears to be more deliberate than it actually was.
When I did my Marines last year, I took a completely different tack - the tanks were sprayed black and then totally drybrushed. I found the finished (decals are still outstanding) product far more pleasing to the eye than the finished Imperial Guard tanks.

Which leaves me frustrated. I'd love to redo the Imperial Guard tanks now that my confidence and abilities with painting vehicles has improved, but I don't have the heart to go back and redo five fully painted tanks and two Sentinels. The problem is I've got the Baneblade, a bunch more Sentinels and a Valkyrie to do too and approaching them in the method I'm currently using is really bugging me.
I guess I'll grit my teeth and keep plugging on with it. I will go back to my older tanks and do some tidy-up work: the freehand details I've painted on them are shockingly poor and they need weathering too (which is a whole other new area for me to develop skills in).
I just needed to have a moan about it is all. Thanks for reading - gripe over.
Update 1 - Jan 03 2014
I've done some work to the front of the model in order to bring it's finish in line with the other sections thus far painted.One of the things I've done is to remove some bits I wasn't happy about. In the pics above you'll notice that when it was built the engine cowlings were left open. They've been completely removed (for later re-attachment in a closed position) as has the rather silly missile that had been glued into the hull-mounted cannon.

Looking at it in the photo there's a detail I'm really not pleased with that doesn't stand out to the naked eye. There's a "ridge" (for want of a better description) that runs from left to right just beneath the small hatch which is under the heavy bolter turret. It looks really messy in the photo so I'll tidy that up when I do my next stint on this model (hopefully some time next week).
Introduction - Dec 2013
As another "keep things ticking over" project to get me past Christmas (and into the 2014) and the restrictions having an 8' tree and pile of presents in the house imposes on my hobby space, I've resumed work on a project I started and left by the wayside a couple of years ago.
My mate Mike bought this model for me as a gift. It was assembled by my son James (during his all-too-brief dalliance with wargaming) and basecoated with grey spray primer.
And there it stayed, for a long, long time.
A few years ago, "modelling guilt" got the better of me and I started working on applying some colour to the model (well, metallic black & silver anyway).
It's a big model and other, more insistent work (like getting armies ready for games) got in the way so it fell by the wayside again. This is how it was left - both sides finished and the main hull largely untouched:


I'll be working on this in small increments over the coming weeks and will post updates as and when I have them.
No comments:
Post a Comment
I'm interested to hear what you think. Please leave any comments you'd like to make here.