Labels

Painting (372) GW (332) Games Workshop (331) Warhammer 40000 (240) Modelling (103) Astra Militarum (65) Imperial Guard (65) Epic (59) Chaos Marines (51) Warhammer 30000 (51) Space Marines (46) Tau (46) Airbrushing (44) Epic Chaos (44) Warhammer (43) Titan (39) Saga (31) Middle Earth SBG (30) Nurgle (29) Gripping Beast (27) IGTanks (25) Anglo-Saxons (24) Blood Bowl (22) Stormcrow Chapter (20) TauTanks (18) Orks (17) Wargames Table (17) Imperial Knights (16) Scenery (16) Black Scorpion (15) Epic Ultramarines (15) Frostgrave (15) Pirates (15) Age of Sigmar (13) 3D Printing (12) Warlord Titan (12) Kings Of War (10) Moria (10) Undead (10) Vampire Counts (10) Angmar (9) Death Guard (9) Forgeworld (9) Mordor (9) Quick Tips (9) Stormcast Eternals (9) AAR (8) Barad Dur (8) Battle Report (8) Goblins (8) Unboxing (8) Wood Elves (8) Isengard (7) Nippon (7) Orcs (7) Siege (7) Wargames Factory (7) Building modular tiles (6) Dreadtober 2016 (6) Sentinels (6) Skaven (6) Vikings (6) Workshop (6) Beastmen (5) Dreadtober 2017 (5) Dropzone Commander (5) Garroting'em Forest (5) Hawk Wargames (5) Humans (5) UCM (5) Warriors of Chaos (5) Imperial Agents (4) Mantic (4) Ogres (4) Sci-Fi Ruins (4) Solar Auxilia (4) Adepta Sororitas (3) Adeptus Ministorum (3) Dwarfs (3) Necromunda (3) Sisters of Battle (3) The Fellowship of The Ring (3) Dead of Dunharrow (2) Kharadron Overlords (2) Nazgul (2) Osgiliath (2) Photography (2) Renedra (2) Trolls (2) Uruk-Hai (2) Amera Plastic Mouldings (1) Armies (1) Bolt Action (1) Cities of Death (1) Days out (1) Germans (1) Giant (1) Marauder (1) Necrons (1) Perry Miniatures (1) Reaper Miniatures (1) Warlord Games (1) em4 Miniatures (1)
Showing posts with label Quick Tips. Show all posts

Wednesday, 12 September 2018

Quick Tip: Hotwiring a Hot-Wire cutter!

In a minor diversion from the norm, I thought I'd post something showing a quick 5 minute hack I made a short while ago.

As you may be aware if you look in on my blog I've been working on building a modular-tile system for a wargames table.

I have a small attention span, so as always I get distracted. Despite not having finished all the tiles yet, I've already started building some scenic pieces to add dimension to the table surface.

Inevitably, this has lead to building some hills.

The hills themselves I'll cover in another post - this one is all about the hot-wire cutter I used in the process.

When I got my cutter out of storage (it hadn't been used in a while) I was irritated to find that the battery had gone flat.

My hot-wire cutter may differ from yours - it#s basically a handle with a twisted pair of cables which end in spade connectors:

...in order to attach to the terminals of a 4.5v battery:

Now I honestly have no recollection of the thought-process that led to this, but I ended up devising (probably via wondering if I could buy a PSU of some sort) a means of safely mains-powering the cutter using an old USB cable and a discarded phone charger.

It goes like this. The hot-wire cutter requires a 4.5 battery. USB runs at 5v. "Near enough for Jazz" as the saying goes. Cut the Micro-USB end off the USB cable and strip off the outer insulation. You'll find four very thin wires inside. You're interested in the red and the black only. You can ignore/chop off the others.

All I did was solder the red and black wires to the spade connectors, wrap a bit of tape around them in order that the spades can't touch each other and - JOB DONE! You can see in the photo below where the red wires from the h-w cutter join the green USB cable, wrapped up in a bit of masking tape.

It works like a dream. Not only do I never have to worry about flat batteries again, the spade connectors weren't that reliable anyway and my cable is now 1m longer to boot.

RESULT!

More "quick tips":

Thursday, 18 December 2014

Tau: Working with Skyrays - Part 3 (Quick Tip)

Here is the last part (aside from actually getting some paint down!) on my series about making the fullest possible use of GWs Tau Skyray and Hammerhead kits.
  • In the first part I covered the options that were available in the kit.
  • In the second part I covered rebuilding the front underslung turret.
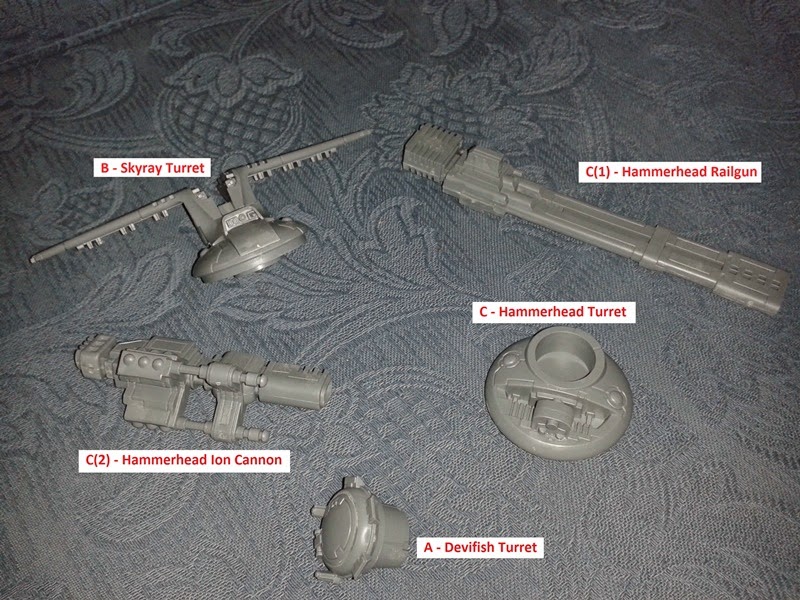
This is the final part and covers modelling the main weapons to make them interchangeable so you can field your Skyray as a Skyray, Hammerhead (with your choice of weapons) or Devilfish.

I'm not the greatest modeller in the world so feel free to improve on anything I'm suggesting here if (and when!) you see a better way of doing it.

First - the easy bit: The Skyray

I only magnetised this so that the missiles can be removed as fired in-game. I think they're designed to push-fit but I found they weren't a good fit and wouldn't stay in place. 
I glued some pieces of paper-clip into the slots

Added some magnets to the missiles. I'm undecided about these particular magnets and may replace them with smaller, inset ones.

And it fits together like this (the engine pod at the back is just to balance the turret)

The second part - the Hammerhead turret. 

I shaved down some of the details on the "block" so that the weapons could fit totally over it and added a magnet at the back...

And another at the front

In order to mount the railgun I fabricated these small bits of, er, things. For scale they're small - the hole is just beg enough for a small magnet and the entire piece fits inside the hole at the bottom of the railgun, nearer the front than the back

You can just see the, er, "thing" in place complete with magnet on the right-hand edge of the hole.

When dropped in place over the block on the turret the magnet holds the railgun in place and stops it tilting forwards
The Ion Cannon is a little more tricky - there's nothing inside it's hole to glue a similar "thing" to so I had to glue a boatload of bits of sprue into it, front and back, in order to be able to mount magnets. It's a looser fit and so needed magnets both front and back.

Not a great photo but you can just make out the bits of sprue and the magnet inside the hole. It's a similar view if you look into the hole from the back of the gun. Two magnets are required to secure this weapon

And here it is in place

Painting of the tanks is going to need to wait until early 2015 as the Christmas Holiday season is a busy time for me and also there's a short "sabbatical" project I want to do too.


Thursday, 13 November 2014

Tau: Working with Skyrays - Part 2 (Quick Tip)

Aaaaaaages ago I wrote a post called "Working with Skyrays - Part 1" after noting that Citadel had been generous in the Skyray model insomuch as with a small amount of work you could use it as a Devilfish or a Hammerhead.

Well, I figured I was overdue to write part 2 and here it is.

I started by cutting a circle of plasticard to cover the hole where the under-turret fits on. I glued a disc magnet to it (actually two - there's one hidden underneath the plasticard too just for a bit of extra "attractiness").

I drilled a hole through the cover where the "peg" normally fits on and then covered that hole with a spare Fire Warrior grenade. Into the hole I glued two small magnets to act as a replacement for the peg and also to attract to the disc magnet shown in the picture above.

I glued a bit of sprue with a magnet in it into the turret itself

Here you can see the turret sitting on the cover (from the 2nd pic above)

I chopped the back off a burst cannon and put a magnet in so it could attach to the turret

and fixed another magnet inside the sensor array using green-stuff

Here you can see the sensor on the turret

and now I can put the whole thing together with sensors (like the Skyray/Hammerhead)...

...or with the burst cannon (like the Devilfish)

And in part 3, I'll tackle dealing with the Skyray and Hammerhead's main weapons.

More Tau-related stuff:

Wednesday, 3 September 2014

Tau: Working with Skyrays - Part 1 (Quick Tip)

Whilst plodding (and I do mean plodding - progress has been way slower than I'd have liked) through building the models for my Tau army, I discovered what appears to be the most generously put-together GW model kit I've ever seen; the Skyray.

Now I've owned my Skyray for a few years now, but until now it has stayed, unbuilt, in its box. As a result, this post may be a little out-of-date as GW may have changed the contents of the kit. I don't know if they have or not - apologies if they have.

Anyway, when I unboxed it, the first thing I thought was "Oh no! They've given me a Hammerhead in a Skyray box" - top of the pile was a sprue containing Ion Cannons and Railguns.

But no! That Sprue is there because it also contains some parts which are common to both kits, namely the burst-cannon/missile-pod drones and the underslung sensor array that goes at the front of the mini.

Ace!

Looking at it a little harder, more possibilities opened up.

The tank is, of course, built on the ubiquitous Devilfish chassis:
The chassis - sensor-pod and turret not installed.
The sprues that chassis come on are Devilfish sprues. As previously mentioned the Hammerhead Sprue is in the box, and of course so is the Skyray sprue. That means that you can build all of the following parts without having to modify anything:

If you stop short of glueing them into place at this point, you will find that they will all just quite nicely drop into the hole in the top of the Devilfish chassis.

So you can have:
A Devilfish
or:
A Hammerhead with a Railgun. You can just see beyond the Railgun that the Devilfish turret drops in to the Hammerhead turret.

or even one of these:
A Hammerhead with an Ion Cannon.
or one of these (as you'd expect):
A Skyray. Naturally.

Now, if you also have a Devilfish kit or another Hammerhead or Skyray, you can probably already see possibilities opening up. You could build them all as Devilfish. You could field a Hammerhead and a Skyray by dropping the appropriate turrets into the Devilfish. The possibilities are manifold and all can be just swapped and changed without glue, from one game to the next.

But it's not all roses.

GW are not known for unstinting generosity. They stinted (is that a word?) here too.

The Devilfish normally carries gun drones. The Hammerhead and Skyray don't come with any of these so if you want to field your tank as a transport you'll need to find some from somewhere, or purchase an upgraded weapon system for your transport.

In addition, some modelling skill is going to be required. You may notice that in the above Hammerhead photos the weapons are hanging limply on the turret. They are designed to be glued in place. 

Also, the underslung turret does not lend itself to easy swapping and as the Devilfish sports a burst cannon and the Skyray and Hammerhead carry a sensor array, some work is required to make them interchangeable.

I'll cover how to overcome those problems in a later post (as soon as I've worked it out!)

Wednesday, 27 August 2014

Tau: Magnetising a Riptide (Quick Tip)

Unboxing and building one Tau troop-type at a time I reached a point where I could no longer hold myself back and tore into the packaging for my Riptide. What a great model!

As with most models, though, there are a number of ways of building it depending on the weapons load-out and sensor suite that you want.

Now I've not play-tested Tau yet so I don't know what the best combination is. Besides, I do like to be able to change things around. The solution: Magnets!

So I started drilling and glueing as follows:
I added a magnet to the top of the "hand" (for sensors, etc) and inserted a small length of cut paper-clip into the slot in the middle of the circle on the back of the hand (for the "power coupling" to attach to)...

Another magnet went into the bottom of the hand for the weapon to attach to...

Magnets went into the recesses at the top of the weapons to attach them to the hands (more easily seen in the upper weapon than the lower in this photo) and a bit of bent paperclip went into one of the recesses on the side of each weapon (for the "button" to attach to)...

The "power coupling" (left) got a magnet inserted in just one end - very tricky drilling job. The other end is too small to work with so I left that be (it will just rest in place). The "button" had a magnet inserted...

Each of the smaller weapons got a magnet too...

For the sensors I just cut a small channel in the bottom and glued a bit of paperclip in place...

So now the arm goes together like this (or with the other weapon or a different sensor)...

And I can add sensors (left) and weapons (right) to the tops of the jump-engines too!
A fairly simple bit of work on the whole - drilling the power-coupling was by far the most difficult part.

It will be a while before I complete the build of this model as I'm only assembling to a stage conducive to easy airbrushing at the moment. I'm trying to do that to the whole force before I start painting anything.

Other Tau-Related stuff:

Monday, 27 January 2014

Quick Tips: Weathering Tanks (chipped paint)

Here's a quick how-to on creating a weathered effect for tank models.

I can't claim to have developed this technique - I stole it from the amazing work of Kris Belleau from miniwargaming.com. It's lifted directly from a video he produced for the MiniWargaming Vault on how to paint a Blood Angels Storm Talon model. Thanks, Kris!

I'd never weathered a tank model before but wanted to apply a weathered look to my Imperial Guard. This decision was made whilst I was working on my Baneblade model, the painting of which is covered here. At the time of writing this guide, I've tested the process but not yet applied it to the Baneblade. If you followed the Baneblade link and found an "off the Mars production line" looking model, check back again in a couple of days!

What I did to test the technique out was to grab a bit of Imperial scrap from my bits box and paint it up to resemble the finish that's on my Imperial Guard tanks:

The method involves using a very small toolset. You need:
  • some open-cell sponge (the sort of stuff minis in blisters come backed with).
  • something to hold the sponge with - tweezers, pliers etc. 
  • some red-brown paint.
  • some silver paint (I found that quite bright silver worked best).
The process is:
  • Paint your tank to the finish you want including all highlighting and decals. This method needs to be applied post-painting but before application of any pigment powders if you're going to do that.
The bit of scrap I used to test
  • Tear off a small (and I do mean small) piece of the sponge. Make the edge as ragged as you can, but try to avoid stray wisps sticking out.
  • Grab it with the pliers/tweezers. I used a rubber band to hold the handles closed - no point in developing cramp whilst working.
  • Dip it in the brown paint - don't completely smother it, but don't under-do it either. 
  • Test it on a bit of paper - make sure you can transfer small, ragged blobs to the model.
  • Apply to the model - target primarily edges and corners - anywhere paint might get scuffed.
  • Using a fresh bit of sponge, repeat the process with the silver paint. Target the same places you've already hit with the red-brown and try to make your impressions overlay the brown areas (so there's just a suggestion of brown left beneath it). If you overdo it with the silver, dab on a bit more red-brown. You can fine-tune that with more silver if required. Remember - the silver should come out as the dominant colour or your model will look like it has "leopard-spots".


And that's it! I found it best not to try to be too precise with the silver paint - the whole point of using the sponge is to get a sort of randomness to the application.

Thursday, 1 August 2013

Quick Tips: Overcoming Airbrush frustrations

As a final update to this post (Now autumn 2014) I've added a section right at the end - possibly the most important section of all.

I originally wrote this post in the summer of 2013 when I was working hard to get into airbrushing for the first time. Since then (it's now Autumn 2013) I've found and overcome more problems so I thought I'd share them alongside my original findings.

All the newer updates are in cyan text, all the original stuff is in white.

I'll start by saying that I'm no expert on this subject. Not by a long chalk.

I've owned an airbrush for a couple of years now, but the amount of time I've actually logged using it doesn't amount to more than a few hours, and at least 75% of that time I would classify as "getting frustrated" time.

What you need your airbrush to do is the one and only job it was built for - shoot paint evenly. Actually getting the airbrush to do this has been my biggest frustration as an airbrush owner. I've spent far more time failing, getting stressed and wound-up by the airbrush than I have actually achieving results with it so far.

But, that said I have managed to overcome some of those frustrations recently and am starting to get more of a feel for the airbrush. My top tips at the moment are as follows:

  1. Mix your paint thoroughly. I bought a milk-frother to help out - it's brilliant and very inexpensive (less than £2.00) and will blend your paint with your thinning medium with very little effort, An image is below for reference.
  2. Mix your paint with the correct "medium". What is "correct" for you amounts to "whatever you can use safely and happily". There's a lot on the web about using "Windex" (an ammonia-based cleaning product, not available in the UK due to marketing restrictions on ammonia) and Iso-Propyl Alcohol (IPA) to thin acrylic paint on the web. I'm not going to say that that advice isn't valid, but tapwater seems to work just as well. I saw a video of a seminar by the VP of Badger airbrushes on the Miniwargaming.com website a while back - he advocated just using water too. Update: Since originally writing this article I've changed my stance on this somewhat. I'm now using a 50/50 blend of tapwater and IPA. The reason being is that I found just using water that the paint was taking a long time to dry on the model. As the IPA is an alcohol, it evaporates much faster so you can handle your model a bit more easily.
  3. Take care to remove any particles from the paint. They *will* gum up your brush. I bought a tea-strainer to help me with this. After you've mixed your paint with your chosen medium, run it through the strainer. I've never yet done this without catching some particles. An image is below for reference.
  4. Aim for that "milk-like" consistency that everyone talks about. This seems to cause much confusion, but what I try to do is to get my paint to behave the way milk does by visualising the way milk runs down the inside of a glass or bottle if you tip it at an angle then level it out again - it leaves a thin film that thins further as it runs down into the glass. Try to get your paint to do that.
  5. I tend to use a gravity-fed brush and this item of advice pertains particularly to that brush type: don't overfill the cup. I'll explain why in the "How to clean" and "When to clean" sections, below. I never fill mine more than about 40% full.
  6. If in doubt, clean it! Even with all these precautions the airbrush still needs periodic cleaning, often in mid-job.

The tea-strainer (upper) and milk-frother (lower). I'm sure you'd worked it out anyway.

How to clean (Refer to the schematic below for names of some of the parts):


  1. Regularly remove the nozzle-cap and give the protruding needle-tip a wipe with a soft tissue. As a test, if you retract but don't depress the trigger ("main lever" in the schematic below) you should see the needle pull back out of sight. If you wipe the airbrush tip on your tissue it should leave a thin line of paint. If not, you have a blockage.
  2. With the nozzle-cap removed, look into the front of the nozzle-cap. Paint builds up here and may cause the aperture that the needle protrudes through to become blocked. Clean it out with a q-tip or similar.
  3. "Bubble" your brush. Take care with this if you have a lot of paint in the cup as it will overflow. Cover the nozzle-cap with your finger and depress and pull-back on the trigger. This will cause a backflow of air from the tip of the brush along the needle and back into the cup. If there are any particulates blocking the flow of paint they should be blown back into the cup. This is one of the reasons I advocate not overfilling your cup.
  4. Rinse it out - tip any paint you still have in the cup back into your paint bottle, turn off your compressor and disconnect the air-hose. Walk to your sink and slowly run cold water into the cup to wash out all the remains of the paint. This is particularly effective when you've emptied the cup by "painting it dry" and then "bubbled" the brush straight afterwards. Leave a small amount of water in the cup and when you've reconnected everything, shoot the water through the brush onto a tissue or neutral surface. You should be able to see a neat cloud of paint with no sputtering or spitting.
  5. Take it to bits and wipe it all down. You probably don't need to do more than remove the handle and nozzle-cap, release the needle chocking nut and then pull the needle out. Wipe the nozzle cap, nozzle and needle clean with soft, damp tissue. You can normally do this with water, but a small amount of white spirit can be useful too. If you *do* use white spirit, make sure you blow it all out of your brush before pointing it at your models or all the hard work you've done might be damaged. Take an opportunity to rinse it out at the same time.
  6. Get some interdental brushes from wherever you shop for your toothpaste - these are great for reaching into the siphon tube (on a siphon brush), down into the channel that runs from the paint cup to the nozzle (on gravity-fed brush) and various other places to boot. MAKE SURE THAT BEFORE YOU START THAT ANY PAINT THAT MIGHT BE IN THERE HAS SOMEWHERE TO GO! For example, if you're going down the cup towards the nozzle, take the nozzle off first otherwise you'll just force thick, dried paint into the nozzle and bung it up for good. Use these in conjunction with an appropriate solvent (white spirit if you've been shooting oil-based paint or IPA if you've been using water-based paints. White spirit can be useful here too, though). I use the red one on my airbrush.

When to clean:


  1. Whenever you've finished for any period of time of more than a few minutes. If paint dries in the brush, especially in the nozzle, you're in trouble.
  2. Whenever the cup is empty, give it a clean. This is one of the reasons I advocate not overfilling the cup - less paint means more frequent cleaning. The extent of the clean at this stage can be judged by how well the brush has been performing for you.
  3. Whenever the delivery of paint seems to reduce. This can just mean your cup is emptying, but it can mean a clean is required too.
  4. Whenever the paint starts to "sputter" or "spit".
  5. If it ever looks like the paint is coming out as more "water" than "paint". I'm not sure of the science behind this, but there are times when shooting paint when what appears to be coming out is just dirty water - it's like the pigment's been left behind. Also see "It's spitting water!" below.
  6. Whenever you think you need to, or the brush just isn't behaving as you'd like!

Airbrush schematic
It looks like a long and complex process to clean an airbrush, but you'll soon get the whole thing down to about 5 mins tops. Also, you'll learn what your brush needs so you won't have to follow the whole process every time.

If you can find a schematic for your particular airbrush, then please refer to it rather than to the one here. This one isn't the diagram for my brush, but for the most part it's a good match (my brush doesn't have a "Crown Needle Cap" for example) and so it's probably a reasonable match for your brush too, but if you can get the exact diagram, all the better.

Maintain your brush (long story, bear with me):

I was working merrily on my Mighty Fortress project a few weeks ago and was finding that the brush was misbehaving. Paint just wouldn't shoot. I'd followed all my own advice from above but was making little headway, so I decided to go for a big clean. This consisted of all the above plus taking the nozzle off and using an interdental brush to clean the channel from the cup to the nozzle and also having a rummage around to see if I could de-gunk the nozzle itself.

What happened was I twisted my nozzle-spanner at an odd angle and broke the nozzle (the conical "front" snapped off the threaded "back"). The thread stayed stuck inside the brush. 

I was on the right track though - I could see that there was a buildup of paint inside the nozzle. I ordered some replacements and (for good measure) a new needle too. I got the thread out of the brush by taking the handle off, removing the chucking nut and then using a pin-vice to grip the back-end of the needle. Pushing forward and rotating the needle clockwise (as viewed from the back of the brush) unscrewed the nozzle-thread and it came out nicely. I completed my clean with the interdental brushes and waited for the spares to arrive.

When they did I immediately fitted a new nozzle, put my old needle back in and was very surprised to find two things:
  1. The brush still wouldn't shoot well,
  2. The needle was protruding out of the front of the brush. A very painful discovery when I tried to "bubble" it for the first time.
I fiddled and mithered for a while until I resolved to replace the needle. Hey presto - no protruding needle and the brush was shooting well again.

I think what had happened was that the constant flow of paint over the needle had worn it down so it could slide further into the brush than it should. The paint build-up in the old nozzle had mitigated against that slightly, but with the new nozzle in place the old needle just wouldn't function.


It's spitting water:

One other issue I've had from time to time is that the brush can spit water (not paint!) when you're painting with it. You can be laying out a nice, even layer and all of a sudden "GOB!" and your clean, smooth finish is toast (with spit on).

What this often seems to be is a build-up of water in the host that runs from the compressor. Switch the compressor off, unscrew the air hose from the compressor and lift your airbrush high into the air so the hose falls straight to the ground. You may find water comes out - let it drain completely before you carry on.

As a preventative measure, if using a compressor you will probably find that there's a see-through vessel near where your air-hose attaches. That's a moisture trap. It will have a valve (normally at the bottom) which you can push to allow it to drain. I'd advise pushing that valve open with a tissue after every few minutes work.


The all-important final note:

By far the best piece of advice I can give became apparent to me recently. I embarked on a totally airbrush-centric project (my Tau army) in order to become as intimately familiar with the airbrush and rid myself of all those last doubts and fears. Total immersion in the tool and so on...

In order to be as ready as possible for it, I did two things:


I cannot underplay the difference it has made to the ease of use I'm now getting from the tool. I point it and pull back the trigger and paint flows! All of the above issues still occur and all the advice is still valid, but the number of times I have to follow my own advice has been massively reduced.

Almost all the frustration has gone - I'm finally really enjoying using my airbrush!

Quick Tips: Snowy bases

I recently bought some modelling snow from a UK based modelling supplier in order to add some "snow" to the bases of my models (I've always thought my basing to be "adequate but boring" so decided to add snow and static grass).

Upon receipt of the "snow" I fairly quickly came to the conclusion that what the substance actually was was good, old-fashioned "bicarbonate of soda". I'm no chemist and have done no testing but in appearance and texture I can discern no difference between the two products.

There's no huge difference in cost between the two though: the quantity of "snow" I got was similar in amount to the bicarbonate of soda tubs available in my local supermarket. It cost £2.70 for the snow as opposed to £0.99 for the baking product, but given that the quantity supplied was enough to base several hundred models I'm not feeling particularly ripped off.

I figured the best way to apply the snow (which I'm adding to bases which are already textured with sand, painted black and drybrushed grey) was to use white PVA glue. This didn't actually work out very well:
As you can see from the picture, the snow has a grey transparent look to it. Like dirty ice rather than snow.

I didn't like it.

I experimented with painting the area I wanted snow on in white, allowing the paint to dry and then applying the PVA and dipping into the snow. That worked but was a bit labour intensive.

I'm a lazy sod so I didn't like that either.

Then I came up with a solution: I realised that PVA and acrylic paint are both water-based so I got an empty paint-dropper-bottle and made a 60:40 mix of PVA and white paint in it. One application of the glue/paint mix and a dip in the snow powder and all is looking fine.

I will experiment with the ratio of the mix: I'd like more glue in it than I currently have as the paint is making it a bit runny. One of the things that seems to make the snow look best is if you can build it proud of the surface of the base in little "drifts" so it looks like it's settled thickly on the base.

I'm quite pleased with the result though:

Update: Since publishing this post I've picked up what sounds like a very interesting tip. Instead of spreading your paint/PVA mix on the base and dipping it in the snow, mix the snow powder into the glue/paint until it forms a thick paste. Then apply to the base - you can get much thicker "drfits" and add a lot more texture.

I've not had a chance to try this out myself yet but am very much looking forward to having a go. I'd also go a little further than I said earlier about having more glue in the glue/paint mix - I think for this you'd need at least an 80:20 mix of PVA:paint.

Monday, 25 March 2013

Quick Tips: Stripping Paint


I struggled with this for years.

All sorts of chemicals of varying costs, smells and levels of toxicity were tried. I never found anything that I felt happy with the results of, or felt safe using/storing.

Until now.

You will need:

  1. A few (two or three) containers to hold enough fluid that you can immerse your models in, preferably with airtight lids so that you can't smell the fluids and to minimise risk of spillage when moving, 
  2. Some cheap toothbrushes (or similar for scrubbing paint), 
  3. Soap and water (for cleaning the models and your hands afterwards), 
  4. Rubber gloves (this can be harsh on the skin and also the smell can linger on your hands) and goggles if you have them (brush-bristles can spray paint/fluid in unexpected directions as you scrub),
  5. White Spirit (not always necessary - see below), 
  6. And the magic ingredient: Dettol! None of the new-fangled, fragranced, squirty-bottle stuff. Just the old "smells like a lift (elevator, for non-English readers), looks like apple-juice" stuff.

Method:

  • Put a 25/75 mix of Dettol/Water into your container. You can use a stronger mix for more stubborn paint if needs be, but this should suffice.
  • Fully immerse your models in the solution. This works for plastic and metal minis, but I do find the paint will come off metals more readily. I haven't tried this on Resin models, so try this on them at your own risk. 
  • Place the lid on your container and leave for 24 hours - longer if you like. I left one set of minis for months with no ill effects. 
  • In a sink or similar, wearing your rubber gloves and with a window open, remove the models one at a time from the solution (don't discard or drain it - you may need to re-immerse or can re-use it for other models) and remove as much paint as you can with your fingertips and the toothbrush. You should find it comes away fairly easily. See "A note on paints" below. 
    • If you can completely remove all paint like this, then simply wash the model clean with your soapy water and allow to dry. 
    • Some paints soften but remain very sticky and become "tar-rey". In this case, Dettol alone won't do the full job. Once you have removed as much as you can after the Dettol bath, you will need to switch to using White Spirit. Important: You will need a different approach for Metal models than for Plastics: 
      • For Metals: take another clean container and fill it with White Spirit. Immerse the models in the White Spirit and leave for an hour or more. Scrub with fingers/toothbrush and the remaining paint should dissolve and come away cleanly. Wash in soapy water and allow to dry. 
      • For Plastics: immersing plastic models in White Spirit for any length of time will cause the model to soften and pick up a slight "cauliflower ear" appearance (I know this to may cost after immersing a Space Marine Rhino for 8 hours - I now have an armoured transport that doubles as a squeezy stress-ball). You can still use White Spirit on these models, but just dip your toothbrush in the White Spirit, scrub and then wash the model clean, keeping the White Spirit on the model for as small an amount of time as possible.
  • If some stubborn paint remains, re-immerse the minis in the solution for another 24 hours (basically, repeat the process). 
  • Regardless of whether you use White Spirit or not - wash your models thoroughly with soapy water when you've finished stripping them. It's vital to get them 100% free of old, soft paint and also of any remaining Dettol/White spirit, as leaving that on the model will play havoc with the next layer of paint or glue you apply. 

A note on paints:

This method works for all paints I've encountered so far. I can't give you an exhaustive list of what those paints are, because I buy a lot of my models second-hand from ebay and the like, and I can't vouch for what paints the previous owners may have used. I have certainly successfully stripped Acrylics (like GW/Citadel, Daler-Rowney, Anita's, Vallejo, Tamiya) and spray (both matt like MattKote and gloss [most likely some sort of car spray-can]). Varnish is no obstacle either. The sprays are often cellulose-based and I suspect it is this that forms the gluey tar that requires you to use the White Spirit.

A note on containers:

Glass or plastic containers are both fine for this method. An airtight lid is vital to prevent spillage and the smell (both Dettol and White Spirits are pungent). The best advice I can give here: 

  • Don't use anything too deep or with a narrow next you won't be able to reach in to retreive your models without tipping the fluid away. 
  • Don't overfill your containers - your models are small! Also, remember to allow for the displacement of fluids when you put your models in the container - the fluid lever will rise with each one. 
  • I find that for most things the sort of plastic resealable containers you get with Chinese take-aways are ideal. You can easily get a unit of troops in one, or even a smaller vehicle like a Space Marine Rhino. 

A note on glues:

You will find that the Dettol will cause models glued with epoxy glues to come apart. The epoxy doesn't dissolve, it just seems to stop binding to the models (true for both metals and plastics). I therefore repeat: I haven't tried this on Resin models, so try this on them at your own risk.